Faceless Digital Marketing PLR Course 30k Words
in Internet Marketing Checklists , Internet Marketing PLR , Internet Marketing PLR eBooks , Marketing PLR , Marketing PLR Ebooks , Online Business PLR , Online Marketing PLR Ebooks , PLR Checklists , PLR eBooks , PLR eCourses , PLR List Building Reports , Premium PLR , Premium PLR eBooks , Premium PLR Reports , Premium White Label Brandable PLR Coaching Courses , Private Label Rights ProductsChoose Your Desired Option(s)
has been added to your cart!
have been added to your cart!
#facelessdigitalmarketing #digitalmarketingplr #plrcourse #marketingstrategies #anonymousmarketing #onlinemarketing #marketingcourse #facelessmarketing #contentforresell #plrbusiness #passiveincome
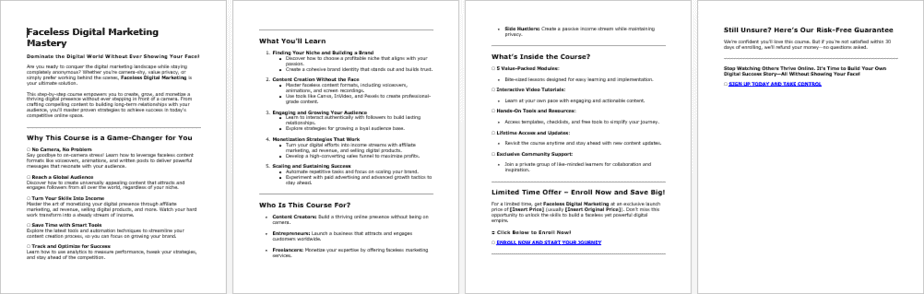
Master Digital Marketing Without Showing Your Face!
Are you ready to build a successful online presence and grow your brand without stepping in front of the camera? The Faceless Digital Marketing PLR Course is your ultimate guide to mastering digital marketing strategies while staying behind the scenes.
This comprehensive course is packed with actionable steps, expert tips, and practical tools to help you create a thriving digital marketing brand—all without ever showing your face!
Presenting…
Faceless Digital Marketing PLR Course 30k Words
What’s Included in the Course?
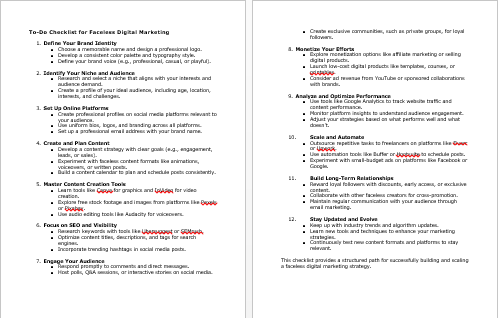
Module 1: Understanding Faceless Branding
Learn how to establish a strong and recognizable online presence without using your image.
- Discovering Your Niche: Find topics that align with your passion and attract the right audience.
- Defining Your Brand Voice: Develop a tone that reflects your personality and resonates with your audience.
- Crafting a Memorable Logo and Name: Stand out with a unique and professional brand identity.
- Building a Consistent Online Identity: Ensure uniformity across platforms for a polished and credible look.
Module 2: Creating Engaging Faceless Content
Produce content that captivates your audience without appearing on camera.
- Choosing Content Formats: Leverage voiceovers, animations, and written content to connect with your audience.
- Learning Tools for Content Creation: Master tools like Canva and InVideo to create professional-grade content.
- Storytelling Without Showing Up: Engage your audience with compelling visuals and narratives.
- Planning and Scheduling Content: Stay consistent with a well-organized content calendar.
Module 3: Growing Your Audience Organically
Attract the right audience and build trust without expensive ads.
- Identifying Your Ideal Audience: Understand who they are and where they hang out online.
- Using SEO to Increase Visibility: Optimize your content for search engines and attract organic traffic.
- Engaging Behind the Scenes: Build connections through comments, DMs, and interactive content.
- Collaborating with Other Creators: Expand your reach through strategic partnerships.
Module 4: Monetizing Your Faceless Brand
Turn your efforts into a profitable business.
- Exploring Monetization Options: From affiliate marketing to selling digital products, learn how to earn.
- Building a High-Converting Sales Funnel: Capture leads and guide them to make purchases.
- Leveraging Ad Revenue Opportunities: Earn from YouTube ads, podcasts, and sponsored content.
- Launching Your Own Products: Create and sell digital courses, templates, or other resources.
Module 5: Scaling and Automating Your Efforts
Take your faceless brand to the next level with advanced strategies.
- Analyzing Performance Metrics: Track what works and improve what doesn’t using analytics tools.
- Outsourcing Repetitive Tasks: Delegate tasks to freelancers and focus on growing your brand.
- Experimenting with Paid Advertising: Test and scale effective ad campaigns.
- Building Long-Term Relationships: Create loyal communities and retain customers with value-driven content.
Who Can Benefit from This Course?
- Aspiring Entrepreneurs: Start your online business without the fear of being in front of the camera.
- Freelancers and Creators: Add faceless digital marketing skills to your portfolio.
- Small Business Owners: Use faceless branding to grow your business effectively.
- Content Marketers: Enhance your strategies for producing engaging, behind-the-scenes content.
What’s Included in This PLR Package?
- Complete Course Content (28,407 words): Step-by-step modules covering every aspect of faceless digital marketing.
- Actionable Checklist (456 words): A handy guide to track your progress.
- FAQs (779 words): Answers to common questions about faceless digital marketing.
- Sales Page (623 words): Professionally written to help you sell this course with ease.
How to Profit from This PLR Course
- Sell It as Your Own Product
Customize the content and offer it as a premium course for $97 or more. - Bundle It with Other Courses
Combine it with complementary digital marketing products to create an irresistible package. - Create a Membership Site
Offer ongoing access to this course as part of a subscription plan for recurring income. - Offer as a Lead Magnet
Use excerpts to grow your email list or funnel leads into paid products. - Use It for Workshops or Coaching
Teach the course content in live sessions or webinars.
Why Choose This PLR Course?
- High-Quality Content: Professionally written and researched.
- Ready to Use: Save time with pre-made content that’s ready to sell or customize.
- Flexible Applications: Use it for eBooks, videos, blog posts, or courses.
- Lucrative Niche: Tap into the growing demand for faceless branding and digital marketing.
Get Started Today!
Own the “Faceless Digital Marketing PLR Course” for Just $14.99!
Don’t miss this opportunity to enter one of the most profitable niches in digital marketing. Empower yourself—or your audience—with the knowledge to build a thriving online presence without showing your face.
has been added to your cart!
have been added to your cart!
Here A Sample of Faceless Digital Marketing PLR Course
Welcome to “Faceless Digital Marketing”! This course is designed to teach you how to create a powerful digital marketing presence without showing your face. We’ll explore strategies for branding, content creation, and audience engagement while staying behind the scenes. Let’s dive in!
Module 1: Understanding Faceless Branding
1. Discovering Your Niche
Step 1: Explore Topics That Excite You and Resonate with Your Target Audience
- Start with a brainstorming session about your passions and interests.
- What activities or subjects do you enjoy most?
- What expertise or skills do you have that others might find valuable?
- Reflect on problems you’ve solved or challenges you’ve overcome that could help others.
- Consider aligning your passions with market needs to create a sustainable niche.
- Example: If you love gardening, explore niches like organic gardening or indoor plant care.
Step 2: Research What Your Target Audience Wants
- Think about who you want to help or entertain.
- Are they beginners looking for guidance, or seasoned enthusiasts seeking advanced tips?
- Consider their demographics, preferences, and pain points.
- Engage in online forums, groups, and communities in your areas of interest.
- Look for recurring questions or topics that spark conversations.
Step 3: Use Google Trends to Validate Ideas
- Visit Google Trends and type in your potential niche keywords.
- Look for:
- Sustained Interest: Topics with consistent search volume over time.
- Seasonal Trends: Identify if interest spikes during specific periods (e.g., holiday-related niches).
- Comparison of Topics: Compare similar topics to see which one has more search interest.
- Sustained Interest: Topics with consistent search volume over time.
Step 4: Explore Questions with Answer the Public
- Go to Answer the Public and enter a keyword related to your niche.
- Review the list of questions and phrases people are searching for.
- Look for common “why,” “how,” or “best” questions to understand what your audience is curious about.
- Example: For “gardening,” you might find questions like “How to start a small vegetable garden?” or “Best indoor plants for beginners.”
By combining personal passion with data-driven research, you’ll discover a niche that both excites you and resonates with your target audience, setting the foundation for success.
Defining Your Brand Voice – Step-by-Step Instructions
Welcome to the course on Defining Your Brand Voice! This section will guide you through the process of choosing the right tone for your brand and creating a mood board that visually inspires your brand’s identity. As international course creators, establishing a consistent and engaging brand voice is crucial in building a relationship with your audience and effectively communicating your message. Let’s dive into the steps!
Step 1: Choose a Tone That Reflects Your Brand’s Personality
1.1 Understanding the Importance of Brand Voice
Your brand voice is essentially the personality and style with which your brand communicates with your audience. It affects every piece of content you create, from emails to course materials and social media posts. A strong brand voice can build trust, attract the right audience, and differentiate you from your competitors. It’s crucial to choose a tone that reflects your brand’s mission, values, and the emotions you want to evoke in your audience.
1.2 Types of Brand Tone to Consider
The tone of your brand should align with the nature of your business and how you want to engage with your target audience. Here are three common tones you may consider:
- Professional
- A professional tone is typically formal, respectful, and clear. It’s ideal for industries where authority, trust, and expertise are paramount, such as finance, healthcare, and legal sectors.
- Example: “Our team of experts is here to guide you through every step of your financial journey.”
- Casual
- A casual tone is friendly, approachable, and conversational. It’s suitable for brands that want to engage with their audience on a personal level and make their messaging feel relaxed and relatable. This tone works well for creative industries, e-learning platforms, and lifestyle blogs.
- Example: “Let’s get started with some fun tips to help you learn faster!”
- Playful
- A playful tone is light-hearted, fun, and humorous. It works well for brands targeting younger audiences or those in the entertainment, gaming, or fashion industries. This tone is perfect if you want to make your audience smile or feel excited about your content.
- Example: “Who said learning can’t be fun? Let’s dive into some cool tricks that’ll make you a pro!”
1.3 Determine Your Brand’s Core Values
Before you decide on your brand tone, it’s important to first define your brand’s core values. Your brand’s personality should reflect these values consistently. Ask yourself the following questions:
- What is my brand’s mission?
- What emotions do I want my audience to associate with my brand?
- What image do I want my audience to have of my business?
Your brand’s tone should always align with these fundamental aspects. For example, a brand that values trust and reliability may adopt a professional or authoritative tone, while a brand that values creativity and fun may lean towards a more playful or casual voice.
1.4 Tailoring Your Tone to Your Audience
Your tone must also take your audience into consideration. Think about the following:
- Demographics: Are you speaking to young professionals, students, or senior citizens?
- Needs and Expectations: Does your audience expect in-depth, analytical content, or do they prefer light, engaging, and easy-to-digest material?
- Cultural Sensitivity: If you’re targeting an international audience, consider the cultural nuances that might affect how your tone is perceived. For example, humor may work well in some cultures, but could be misinterpreted in others.
By defining your tone and aligning it with your audience’s expectations, you’ll create a stronger, more personal connection with them.
Step 2: Create a Mood Board to Inspire Your Brand’s Look and Feel
2.1 The Role of a Mood Board in Defining Your Brand Voice
A mood board is a visual collection of images, colors, fonts, and other design elements that represent the essence of your brand. It acts as a guide for your brand’s overall look and feel, ensuring consistency across all your communications. When creating a mood board for your brand voice, you’re not just selecting attractive visuals; you’re building a visual language that complements your tone and conveys your brand’s personality effectively.
2.2 Collect Visual Inspiration
The first step in creating a mood board is gathering inspiration that resonates with your brand’s identity and tone. Here are a few ways to start collecting:
- Look for Inspiration Online
Use platforms like Pinterest, Behance, or Instagram to search for visual content related to your brand values and tone. Look for color schemes, design styles, photography, and even typography that align with how you want your audience to feel when interacting with your content. - Create a Visual Representation of Your Values
If your brand values trust and professionalism, you might lean towards minimalist design with neutral tones and clean fonts. If your brand values creativity, you might use bold colors, abstract designs, and dynamic shapes.
2.3 Choose Your Color Palette
Colors play a critical role in communicating your brand’s personality. Different colors evoke specific emotions, and it’s important to choose a palette that reflects the tone of your brand.
- Professional Tone: Muted tones like navy, black, gray, and deep greens typically convey professionalism, trust, and reliability.
- Casual Tone: Softer hues like pastel blues, greens, and earthy tones may communicate friendliness, warmth, and approachability.
- Playful Tone: Bright, energetic colors like orange, pink, yellow, and turquoise evoke fun, excitement, and enthusiasm.
2.4 Choose Fonts and Typography
Typography is another important element of your brand’s visual identity. Different font styles communicate different messages. Here’s a brief guide to help you choose:
- Professional Tone: Choose clean, modern sans-serif fonts like Helvetica, Arial, or Roboto, or classic serif fonts like Times New Roman or Georgia for an authoritative, polished look.
- Casual Tone: Rounded fonts like Poppins or Lato, or hand-lettered script fonts, can help create a more informal, approachable vibe.
- Playful Tone: Use bold, quirky fonts that stand out, such as Comic Sans or playful handwritten fonts, which are ideal for fun and lively brands.
2.5 Compile Your Mood Board
Now that you have gathered color schemes, fonts, and other elements, it’s time to create your mood board. Use tools like Canva, Pinterest, or Adobe Spark to assemble your visuals. Here’s how to organize it:
- Top Section: Place elements that represent your brand’s core values and tone. Include your color palette and visual inspiration here.
- Middle Section: Showcase typography choices and logos that represent your brand’s look.
- Bottom Section: Include any photography or visual elements that support the mood and vibe you want to convey, such as images of your target audience, style of product or service, or anything else that captures your brand’s essence.
2.6 Use Your Mood Board as a Guide
Your mood board will serve as a visual reference for all of your content creation moving forward. Every blog post, social media graphic, website design, and email campaign should reflect the mood board’s elements, ensuring that your visual identity remains consistent across platforms.
Step 3: Putting It All Together
By the end of this module, you will have:
- A clearly defined brand tone that reflects your values, aligns with your audience’s expectations, and stays true to your personality.
- A mood board that visually encapsulates your brand’s identity, providing a cohesive look and feel for your content.
This will ensure that whether you’re creating a course, launching a new campaign, or designing a website, every touchpoint will speak with one clear voice, helping you build a more engaging and memorable brand.
Crafting a Memorable Logo and Name – Step-by-Step Instructions
Welcome to the section on crafting a memorable logo and name for your brand! This is one of the most crucial aspects of building your brand identity. A well-thought-out name and logo not only help you stand out in a crowded market but also communicate your brand’s values, mission, and personality to your audience. In this guide, we’ll walk you through each step of the process of brainstorming a unique name and designing a simple yet eye-catching logo, especially tailored for international course creators.
Step 1: Brainstorm Unique Names That Are Easy to Spell and Remember
1.1 Understand the Power of a Good Name
Your brand name is the first thing your audience will interact with. It’s more than just a label; it’s the foundation of your brand identity. The right name helps build a connection with your audience and gives them a sense of what your course or business is about. It’s important that the name is easy to pronounce, spell, and remember, particularly for an international audience. In a world where digital content is king, clarity and simplicity are key.
1.2 Tips for Brainstorming a Unique and Memorable Name
When brainstorming your brand name, consider the following:
- Keep It Simple
A name that’s easy to spell and pronounce is essential, especially if you’re targeting an international audience. Avoid complicated words, spellings, or phrases that could confuse people or be hard to remember.- Example: “SkillBoost” is easy to pronounce, spell, and remember, making it a good choice for a course creator brand.
- Example: “SkillBoost” is easy to pronounce, spell, and remember, making it a good choice for a course creator brand.
- Reflect Your Brand’s Identity
Your name should give an immediate sense of what your business is about. Whether you’re offering online courses on photography, finance, or personal development, try to incorporate words or terms related to your field. This helps your audience quickly understand what they can expect from your brand.- Example: “FinPro Academy” clearly indicates that this brand focuses on financial education.
- Example: “FinPro Academy” clearly indicates that this brand focuses on financial education.
- Be Creative and Unique
While you want your name to be simple, it should also be distinct. Avoid generic names that could easily be confused with other businesses. You want to carve out a unique space in the market.- Example: Instead of something like “Online Courses Hub,” try something more original, like “LearnCrafters” or “MasteryPath.”
- Example: Instead of something like “Online Courses Hub,” try something more original, like “LearnCrafters” or “MasteryPath.”
- Consider Your Target Audience
Think about the demographic and cultural factors that might influence how your brand name is received internationally. Avoid using slang or phrases that may have different meanings in different languages. If you’re catering to a global market, ensure that your name is easy to understand across cultures.- Example: “EduGlobe” is a simple name that appeals to a global audience.
- Example: “EduGlobe” is a simple name that appeals to a global audience.
- Check for Domain Availability
In today’s digital age, it’s essential that your brand name has an available domain for your website. Before finalizing your brand name, ensure that a matching domain is available (e.g., www.yourbrandname.com). You can use websites like GoDaddy or Namecheap to check for domain name availability.
1.3 The Brainstorming Process
Here’s a step-by-step process you can follow to brainstorm your brand name:
- Write Down Keywords
List words related to your courses, industry, and the experience you want to offer your audience. Consider your values, the emotions you want to evoke, and the benefits of your courses.- Example: For a course on digital marketing, your keywords might include “growth,” “skills,”
- Example: For a course on digital marketing, your keywords might include “growth,” “skills,”
- Combine and Play with Words
Mix and match the words from your list. Try using prefixes, suffixes, or word combinations to create something unique.- Example: Combining “Learn” and “Innovate” could lead to “Learnovate.”
- Example: Combining “Learn” and “Innovate” could lead to “Learnovate.”
- Test Your Ideas
Narrow down your list to 5-10 name ideas. Say them out loud, check for any negative connotations, and ask for feedback from colleagues or potential customers. - Check Availability
Once you have a few options, check if the names are available as domain names and on social media platforms. It’s also important to check that no one else is using the name in your industry.
Step 2: Use Free Tools Like Canva or Hatchful to Design a Simple, Eye-Catching Logo
2.1 The Role of a Logo in Brand Identity
Your logo is one of the most recognizable parts of your brand. It’s an essential visual element that gives your business a face and serves as a quick way for people to identify your courses or services. A well-designed logo can evoke emotions and leave a lasting impression, which is why it’s important to create something both simple and meaningful.
2.2 Key Considerations for Designing Your Logo
When designing your logo, keep the following in mind:
- Simplicity
Logos should be simple, clean, and not overly complex. A cluttered logo can confuse your audience and may not be easily recognizable. Think about iconic logos like Apple or Nike—both are minimalist yet incredibly memorable.- Tip: Limit the number of colors and design elements to ensure your logo is clear and impactful.
- Tip: Limit the number of colors and design elements to ensure your logo is clear and impactful.
- Relevance
The logo should reflect the nature of your business or courses. If you’re a course creator in the technology space, consider incorporating modern, tech-inspired elements. If you’re focusing on creative arts, think about using vibrant colors or artistic shapes.- Example: A logo for a creative writing course could feature a quill or an open book, while a logo for a marketing course might include abstract shapes or arrows.
- Example: A logo for a creative writing course could feature a quill or an open book, while a logo for a marketing course might include abstract shapes or arrows.
- Scalability
Your logo needs to work across different sizes and formats, from large banners to small icons. Test how your logo looks in different sizes to ensure it remains recognizable and doesn’t lose its clarity when scaled down. - Timelessness
A good logo should stand the test of time. Avoid overly trendy designs that may look outdated in a few years. Aim for a design that will still be relevant and effective in the long run.
2.3 Using Canva to Design Your Logo
Canva is a user-friendly tool that allows you to design professional-looking logos without any design experience. Here’s how to use Canva to create your logo:
- Create a Canva Account
If you haven’t already, sign up for a free account on Canva.com. - Choose the Logo Design Template
Once you’re logged in, search for “logo” in the template search bar. Canva offers a wide range of pre-made templates that you can customize. - Customize the Template
Select a logo template that aligns with your brand identity and start customizing it. You can change the text, colors, fonts, and symbols to reflect your brand’s personality.- Tip: Keep the color palette simple and aligned with your brand values. Use two or three complementary colors at most.
- Tip: Keep the color palette simple and aligned with your brand values. Use two or three complementary colors at most.
- Download Your Logo
Once you’re satisfied with the design, click the “Download” button at the top-right corner of the screen. Canva allows you to download your logo in multiple formats, including PNG, JPEG, or PDF.
2.4 Using Hatchful to Design Your Logo
Hatchful is another free tool that helps you create logos quickly. Here’s how to use it:
- Visit Hatchful by Shopify
Go to hatchful.shopify.com and click “Get Started.” - Select Your Industry
Hatchful will prompt you to select the industry your brand belongs to. For course creators, you may choose “Education” or “Technology” depending on your niche. - Pick Your Style
Hatchful will ask you to choose a visual style that best suits your brand. Select from options like bold, elegant, friendly, or minimalistic. - Customize Your Logo
Hatchful will generate several logo options based on your selections. You can then customize the text, color scheme, and font to make it your own. - Download Your Logo
After finalizing your logo, Hatchful allows you to download it in multiple file formats, ready to use for your website, social media, or marketing materials.
Step 3: Finalizing Your Logo and Name
After brainstorming your name and designing your logo, it’s time to finalize both:
- Review Your Logo and Name Together
Look at your logo and name as a whole. Do they complement each other? Does your name align with the visual elements of your logo? Ensure that the overall brand identity is cohesive. - Test Your Logo
Share your logo with friends, colleagues, or potential customers for feedback. Ask them if the logo clearly represents your brand and if it’s memorable. - Use Your Logo Consistently
Once your logo is finalized, use it consistently across all your brand materials—your website, social media profiles, email signatures, and course materials. Consistency builds recognition.
By the end of this course section, you will have:
- A unique, memorable name that is easy to spell, pronounce, and remember, helping you stand out in the international marketplace.
- A professionally designed logo that reflects your brand’s personality and resonates with your target audience.
This will set the foundation for a strong, cohesive brand identity that you can use to build trust and connect with your audience effectively.
Building a Consistent Online Identity – Step-by-Step Instructions
Welcome to the section on Building a Consistent Online Identity!
As an international course creator, establishing a strong and consistent online presence is essential for attracting, engaging, and retaining your audience. A cohesive identity across all platforms reinforces your brand’s credibility and helps you build trust with potential customers. In this section, we will guide you through the steps of creating uniform profiles across all platforms, including social media and your website, and the importance of using a professional email address that aligns with your brand.
Step 1: Create Uniform Profiles on All Platforms with Matching Bios, Logos, and Colors
1.1 The Importance of Consistency Across Platforms
When your audience encounters your brand on multiple platforms—whether it’s your website, social media, or email—they should immediately recognize your brand. Consistency across all profiles creates a unified experience for your audience and strengthens your brand’s identity. A well-established online presence builds trust and makes it easier for potential customers to find and engage with your courses.
If your brand appears differently across platforms, it can confuse your audience and hurt your credibility. Therefore, it’s crucial to ensure that your bios, logos, and colors are aligned across all channels. This consistency gives your audience confidence that they’re interacting with the same brand, no matter where they find you.
1.2 Steps to Create Uniform Profiles Across Platforms
- Choose a Consistent Username or Handle
Your username is one of the first things your audience will notice. It should be simple, memorable, and consistent across all social media platforms and your website. Ideally, your username should reflect your brand name.- Tip: Use tools like Namechk (www.namechk.com) to check the availability of your brand name across various social media platforms.
- Example: If your brand name is “SkillBoost Academy,” aim for handles like @SkillBoostAcademy on Instagram, Twitter, and Facebook.
- Design a Matching Logo
Your logo should be used across all platforms, including social media, your website, and email signatures. This visual consistency ensures that your audience can immediately recognize your brand wherever they encounter it.- Tip: Use the logo you’ve designed (in previous lessons) in formats that work well for all platforms, such as circular or square versions. The logo should be clear even when scaled down, as many platforms will display it as a small profile picture.
- Example: If your logo includes text, ensure that it’s legible at smaller sizes. Consider creating a simplified version of your logo (just an icon or a short initial) for platforms where space is limited.
- Craft a Uniform Bio Across Platforms
Your bio should clearly explain what your brand offers and reflect your brand’s voice. Make sure that the tone, message, and key details are consistent on each platform. Here’s how you can maintain uniformity:- Social Media Bios: Keep them concise but informative. Highlight your course expertise, value proposition, and any calls to action (e.g., “Sign up for my free course today!”).
- Website Bio: Include more details, such as your qualifications, mission, and a brief overview of the courses you offer. This can be a bit longer than your social media bios but should still reflect your brand voice.
- Example:
- Instagram Bio: “Helping professionals excel with online courses | Digital marketing & tech skills | Join my community for free tips”
- Website Bio: “Welcome to SkillBoost Academy, where digital marketing and tech skills meet professional development. I’m here to help you elevate your career through affordable and effective online courses.”
- Social Media Bios: Keep them concise but informative. Highlight your course expertise, value proposition, and any calls to action (e.g., “Sign up for my free course today!”).
- Align Your Colors Across All Platforms
Choose a color palette that matches your brand’s personality and ensure consistency across your profiles. The colors you use should evoke specific emotions and align with your course’s theme.- Tip: Use a tool like Coolors (www.coolors.co) to create a professional color palette. Stick to 2-3 main colors for your brand identity and apply them consistently on your website, social media graphics, logo, and email marketing templates.
- Example: If your brand focuses on productivity and professionalism, you may choose a color palette of blue (trust), white (clarity), and grey (neutrality).
- Create Visual Consistency
It’s not just about your logo and colors; the overall design should reflect your brand’s style. This includes the fonts you use, the layout of your social media pages, and the style of your graphics.- Tip: Use Canva or Adobe Spark to create graphics that match your brand’s visual identity. This includes post templates, banners, and covers for social media platforms.
1.3 Platform-Specific Tips for Uniformity
- Instagram and Facebook: Both platforms are heavily visual, so ensure your logo fits well as a profile image and that your post templates align with your brand colors.
- LinkedIn: Here, a professional profile image, a banner that matches your branding, and a well-crafted summary are key to establishing your authority. Write a clear, concise bio that communicates your course offerings.
- Twitter: Focus on a catchy bio with a link to your website or landing page. Consistency in profile image and banner image will help reinforce your brand.
- YouTube: Your logo should be used as a profile image, and your banner should reflect your branding. Consider using consistent video thumbnails with your brand colors.
Step 2: Use a Professional Email Address That Includes Your Brand Name
2.1 Why You Need a Professional Email Address
A professional email address is essential for building trust and credibility with your audience, especially in the online education space. A personalized email address that reflects your brand name (e.g., info@SkillBoostAcademy.com) gives your communication a professional appearance and reassures your audience that they’re dealing with a legitimate business.
Using generic email services like Gmail (e.g., skillboostacademy@gmail.com) may be seen as unprofessional, especially when you’re offering paid courses and services. A custom email address tied to your domain shows that you’re serious about your business and helps maintain a consistent brand image.
2.2 Steps to Create a Professional Email Address
- Get a Custom Domain
The first step is purchasing a domain name (e.g., www.SkillBoostAcademy.com) if you don’t already have one. You can easily purchase a domain through domain registrars like GoDaddy, Namecheap, or Google Domains.- Example: If you own SkillBoostAcademy.com, you should use an email address that aligns with this domain.
- Example: If you own SkillBoostAcademy.com, you should use an email address that aligns with this domain.
- Set Up Professional Email Hosting
After securing your domain, you will need to set up email hosting. You can use services like Google Workspace, Microsoft 365, or Zoho Mail to create a professional email address. These services offer the tools to manage your email, as well as additional benefits like calendars, file storage, and collaboration tools.- Example: Create an email address like info@SkillBoostAcademy.com or support@SkillBoostAcademy.com.
- Example: Create an email address like info@SkillBoostAcademy.com or support@SkillBoostAcademy.com.
- Create Multiple Email Addresses
Depending on your business needs, you may want to set up various professional email addresses:- info@yourbrand.com for general inquiries.
- support@yourbrand.com for customer service.
- admin@yourbrand.com for administrative purposes.
- hello@yourbrand.com or contact@yourbrand.com for first-time visitors or inquiries.
- Brand Your Signature
Every time you send an email, you want to make sure that your signature reflects your brand’s identity. Include your logo, your name, and your course offerings in your email signature. You can also add links to your website and social media profiles to make it easy for your recipients to connect with you.- Example Signature:
- Netai Roy
- Founder, SkillBoost Academy
- “Helping You Build Your Skills for the Future”
- info@SkillBoostAcademy.com
- [Website Link] | [Social Media Links]
- Example Signature:
- Avoid Using Personal Email Addresses
Never use personal email addresses (e.g., netai.roy@gmail.com) for your business communications. Using a business-specific email creates a sense of professionalism and legitimacy, which is crucial when establishing trust with international students and clients.
Step 3: Finalizing Your Online Identity
3.1 Review Your Profiles for Consistency
Once you’ve set up all your platforms and email addresses, it’s important to review everything to ensure consistency.
- Check that your bios, logos, and colors align on every platform.
- Ensure that the tone of your messaging is uniform.
- Test your email signature to ensure it’s easy to read and professional.
3.2 Regular Updates and Maintenance
Your brand identity should evolve with your business. Regularly update your profiles, email signature, and branding materials to ensure they reflect any changes in your course offerings or business direction.
- Tip: Schedule a quarterly review of all your platforms to ensure they’re still in line with your brand’s objectives.
3.3 Engagement Across Platforms
Once everything is set up, it’s time to engage with your audience. Respond to comments, share relevant content, and continue building relationships with your followers. By maintaining a consistent brand identity, you’ll create a stronger bond with your audience over time.
By the end of this course section, you will have:
- A unified online identity with consistent profiles, bios, logos, and colors across all platforms.
- A professional email address that reinforces your brand and establishes credibility with your audience.
This will allow you to stand out as a professional and trustworthy international course creator.
We’re also giving these extra bonuses
Faceless Digital Marketing – Checklist
Faceless Digital Marketing – FAQs
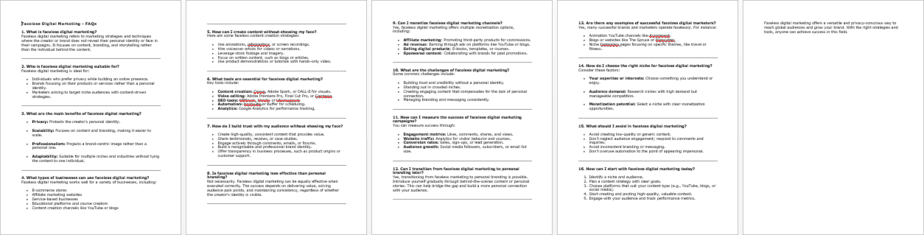
Faceless Digital Marketing – Salespage Content
Package Details:
Word Count: 28 407 Words
Number of Pages: 108
Faceless Digital Marketing – Bonus Content
Checklist
Word Count: 456 words
FAQs
Word Count: 779 words
Salespage Content
Word Count: 623 words
Total Word Count: 30 265 Words
Your PLR License Terms
PERMISSIONS: What Can You Do With These Materials?
Sell the content basically as it is (with some minor tweaks to make it “yours”).
If you are going to claim copyright to anything created with this content, then you must substantially change at 75% of the content to distinguish yourself from other licensees.
Break up the content into small portions to sell as individual reports for $10-$20 each.
Bundle the content with other existing content to create larger products for $47-$97 each.
Setup your own membership site with the content and generate monthly residual payments!
Take the content and convert it into a multiple-week “eclass” that you charge $297-$497 to access!
Use the content to create a “physical” product that you sell for premium prices!
Convert it to audios, videos, membership site content and more.
Excerpt and / or edit portions of the content to give away for free as blog posts, reports, etc. to use as lead magnets, incentives and more!
Create your own original product from it, set it up at a site and “flip” the site for megabucks!
RESTRICTIONS: What Can’t You Do With These Materials?
To protect the value of these products, you may not pass on the rights to your customers. This means that your customers may not have PLR rights or reprint / resell rights passed on to them.
You may not pass on any kind of licensing (PLR, reprint / resell, etc.) to ANY offer created from ANY PORTION OF this content that would allow additional people to sell or give away any portion of the content contained in this package.
You may not offer 100% commission to affiliates selling your version / copy of this product. The maximum affiliate commission you may pay out for offers created that include parts of this content is 75%.
You are not permitted to give the complete materials away in their current state for free – they must be sold. They must be excerpted and / or edited to be given away, unless otherwise noted. Example: You ARE permitted to excerpt portions of content for blog posts, lead magnets, etc.
You may not add this content to any part of an existing customer order that would not require them to make an additional purchase. (IE You cannot add it to a package, membership site, etc. that customers have ALREADY paid for.)
Share Now!
Latest Products


Free Sales Funnel Builder

Related Products
Popular & Trending


Featured Products