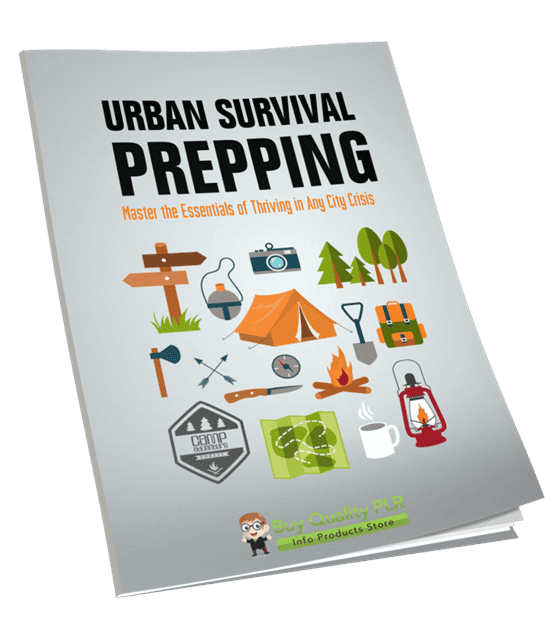
Urban Survival Prepping PLR Course 21k Words
in PLR Checklists , PLR eBooks , PLR eCourses , PLR List Building Reports , Premium PLR , Premium PLR eBooks , Premium PLR Reports , Premium White Label Brandable PLR Coaching Courses , Private Label Rights Products , Survival PLR , Survival PLR eBooksChoose Your Desired Option(s)
has been added to your cart!
have been added to your cart!
#urbansurvival #preppingguide #selfreliance #plrcourse #emergencypreparedness #plrcontent #survivalskills #digitalproducts #safetytips
Urban Survival Prepping PLR Course – Master the Essentials of Thriving in Any City Crisis
Empower Your Audience to Be Prepared, Confident, and Ready for Anything — While You Profit in the High-Demand Survival Niche!
When disaster strikes, most people panic. But the ones who prepare? They survive — and thrive.
From power outages to civil unrest and supply chain disruptions, urban survival prepping has become one of the hottest, most profitable niches online. People everywhere are looking for real, actionable guidance on how to stay safe and self-reliant during city-based emergencies.
Now, you can provide them with that knowledge — instantly — using this ready-to-sell PLR course, Urban Survival Prepping: Master the Essentials of Thriving in Any City Crisis.
This high-quality, fully editable Private Label Rights course delivers over 19,000 words of expert survival training content in an easy-to-understand, actionable format. It’s your opportunity to sell or repurpose a complete course that helps others stay safe — and helps you build a profitable, authority brand in the survival and self-reliance niche.
Presenting…
Urban Survival Prepping PLR Course 21k Words
Why the Urban Survival Niche Is Booming
Global events over the past few years have reminded everyone how fragile modern city life can be.
Power grids fail. Grocery shelves empty. Civil unrest spreads.
People are realizing the importance of preparedness — but they need help learning how to do it.
That’s where this course comes in. It provides step-by-step, real-world survival strategies tailored specifically for urban environments — making it perfect for audiences who live in cities, not in the wilderness.
The survival niche is massive, evergreen, and growing. And with this done-for-you course, you can quickly step into it with zero writing, research, or technical effort.
Course Overview
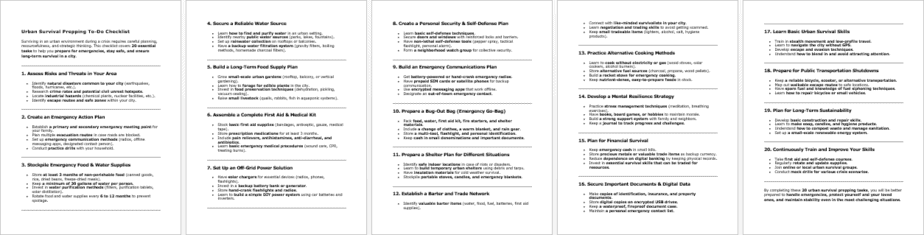
The Urban Survival Prepping PLR Course teaches practical strategies to survive and stay secure during city crises.
Through 5 comprehensive modules, learners discover how to plan ahead, prepare essential gear, protect their home and family, and make smart decisions in high-stress situations.
Each module includes four detailed steps that walk readers through actionable tasks — helping them build confidence and capability, one lesson at a time.
Module 1: Building Your Urban Survival Mindset
Stay Calm, Think Smart, Be Prepared
Before you can master survival skills, you need the right mindset.
This module helps readers develop mental readiness, awareness, and adaptability for any urban emergency.
- Step 1: Understand the Importance of Preparedness
Learn why city-based crises differ from wilderness survival — and how small disruptions can quickly spiral out of control. - Step 2: Develop Situational Awareness
Train your senses to detect early warning signs and use the “OODA Loop” (Observe, Orient, Decide, Act) for split-second decisions. - Step 3: Create a Personalized Survival Plan
Identify threats, establish meeting points, plan escape routes, and build a reliable communication plan. - Step 4: Practice Mental Resilience
Use calm-breathing and visualization techniques to stay level-headed when chaos hits.
This module lays the foundation for strong survival instincts and decision-making under pressure.
Module 2: Essential Gear & Supplies for Urban Survival
Be Ready with the Right Tools & Resources
Preparation isn’t just mental — it’s also about having the right gear. This module covers how to build survival kits that actually work in city environments.
- Step 1: Build Your Everyday Carry (EDC) Kit
Learn which compact tools — like multi-tools, flashlights, and portable chargers — can make all the difference in an emergency. - Step 2: Assemble a 72-Hour Bug-Out Bag (BOB)
Discover what to pack, how to balance weight, and which backpacks offer durability and mobility. - Step 3: Stockpile Home Emergency Supplies
Explore the five essential survival categories: food, water, medicine, tools, and self-defense — plus storage hacks for small apartments. - Step 4: Prepare for Power & Water Outages
From solar chargers to DIY filtration, this step teaches how to handle blackouts and water shortages like a pro.
This module gives learners a full blueprint for building a sustainable survival setup — even in tight urban spaces.
Module 3: Urban Self-Defense & Personal Safety
Protect Yourself and Your Loved Ones
Knowledge and preparation mean little without safety. This module teaches essential personal protection tactics for surviving and avoiding danger.
- Step 1: Master Basic Self-Defense Techniques
Simple, practical moves to deter attackers and escape common threats — with an emphasis on awareness and body language. - Step 2: Learn Defensive Driving & Safe Travel Strategies
Smart navigation tactics for moving through unstable areas or civil unrest zones safely. - Step 3: Home Security & Fortification
Easy upgrades like reinforced doors, alarm systems, and hidden safe zones that protect your family. - Step 4: Non-Lethal & Lethal Defense Options
Covers the responsible use of pepper spray, tasers, and (if legal) firearms — with guidance on de-escalation and safety.
Readers walk away with confidence in their ability to protect themselves, their family, and their property — without fear.
Module 4: Surviving Without Government Assistance
Be Self-Sufficient & Resourceful When Help Isn’t Coming
City infrastructure can fail fast — and when it does, you’ll need to rely on your own skills.
- Step 1: Find & Purify Emergency Water
Learn where to find water in urban settings and purify it safely using filters, boiling, or chemicals. - Step 2: Scavenging & Bartering in a Crisis
Smart, ethical ways to locate supplies and trade without risking your safety. - Step 3: Cooking & Food Preservation Without Power
Discover urban-friendly food storage, no-cook recipes, and container gardening. - Step 4: First Aid & Medical Preparedness
Master essential first aid skills, build a reliable medical kit, and explore natural remedies when hospitals are closed.
This module transforms panic into preparedness — empowering students to stay independent even when systems collapse.
Module 5: Bugging In vs. Bugging Out
Know When to Stay & When to Leave
One of the hardest survival decisions is whether to shelter in place or evacuate. This module helps learners make that call with confidence.
- Step 1: When to Stay Put (Bugging In)
Learn how to fortify your home, conserve resources, and stay off the radar during extended crises. - Step 2: When to Evacuate (Bugging Out)
Identify key warning signs and map safe escape routes and destinations. - Step 3: Making a Survival Shelter in the City
How to find secure, hidden shelters using limited materials and creativity. - Step 4: Rebuilding & Thriving After a Crisis
Reconnect with your community, rebuild stability, and prepare for the next challenge.
This final module ties everything together — giving readers the confidence to adapt, survive, and thrive after disaster strikes.
What’s Included in the PLR Package
When you purchase the Urban Survival Prepping PLR Course, you receive everything you need to start selling or using it immediately:
- Complete 19,014-Word Course – Five in-depth modules, each broken into actionable steps written in clear, conversational English.
- Checklist (965 Words) – A quick-reference tool summarizing the key takeaways and steps for every module.
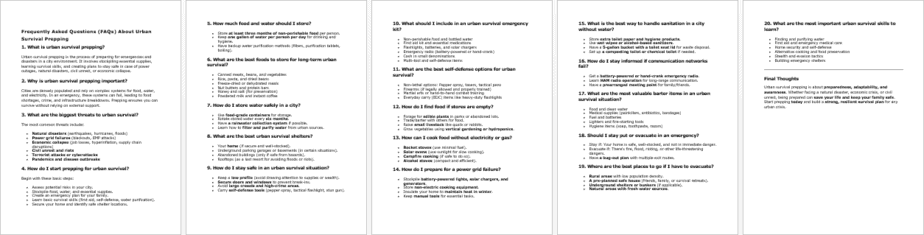
- FAQs (940 Words) – Answers to the most common questions about survival prepping, gear, and strategies.
- Sales Page Copy (601 Words) – A pre-written sales page you can instantly upload to your store or funnel.
Everything is editable, brandable, and 100% ready to sell.
Why This PLR Course is Perfect for You
This PLR course isn’t just content — it’s a business asset.
Here’s why it’s a smart investment:
✅ High-Demand Niche: The preparedness and survival market continues to grow as people seek peace of mind in uncertain times.
✅ Actionable & Practical: Every module is filled with real-life steps anyone can follow, not just theory.
✅ Professionally Written: Over 19,000 words crafted for readability and authority.
✅ Flexible Format: Sell as a course, bundle, eBook, or video series.
✅ Evergreen Appeal: Urban survival never goes out of style — it’s timeless and relevant.
✅ Zero Creation Time: Skip months of writing and editing — your course is ready to sell today.
Ways to Profit from This PLR Course
Your license gives you full flexibility to profit from this content in multiple ways. Here are a few ideas:
- Sell It as a Complete Course
Offer it as a paid product on your website or on platforms like Teachable, Udemy, or Thinkific. - Create a Survival Blog or Membership Site
Use the course as cornerstone content for a membership community focused on preparedness. - Bundle It With Other PLR Products
Combine with related courses (like “Emergency Home Preparedness” or “Self-Defense Basics”) and sell as a premium bundle. - Break It Into Micro Products
Sell each module as a mini-guide or short eBook for $10–$20 each. - Convert It Into Video or Audio Content
Record each module and sell as an audio course or YouTube playlist to expand your reach. - Use It as a Lead Magnet or Email Funnel
Offer excerpts or checklists for free to grow your email list and upsell the full course. - Flip It for Profit
Build a survival niche website around this content and resell it as a ready-made business.
License Terms
You CAN:
✅ Edit, rebrand, and sell as your own product
✅ Convert to video, audio, or print
✅ Add to a paid membership or training platform
✅ Use excerpts for lead magnets, blog posts, or marketing
You CANNOT:
❌ Pass on or resell PLR rights
❌ Give the full package away for free
❌ Offer 100% affiliate commissions (max 75%)
These rules protect the value of your purchase and ensure that only you can profit from your version.
Take Action — Turn Survival Knowledge Into Profit Today!
The Urban Survival Prepping PLR Course gives you a professional, market-ready product in one of the most lucrative and evergreen niches online.
You get:
✅ A full 19,014-word training course
✅ A detailed checklist and FAQ guide
✅ Ready-to-upload sales page
✅ Full PLR rights to rebrand and resell
Empower your customers with the knowledge to protect their families — and empower yourself with a product that builds authority, generates income, and creates long-term business growth.
Download your copy today and start selling your very own Urban Survival Prepping Course within hours! 🧭 Stay ready. Stay profitable. Stay prepared.
has been added to your cart!
have been added to your cart!
Here A Sample of Urban Survival Prepping PLR Course
Welcome to Urban Survival Prepping! Whether it’s a natural disaster, power outage, civil unrest, or supply chain disruption, being prepared gives you peace of mind. This course will guide you through practical steps to help you and your family stay safe, secure, and ready for anything.
Course Breakdown:
You’ll go through 5 modules covering key survival skills, each with 4 simple steps to help you build a strong survival plan.
Module 1: Building Your Urban Survival Mindset
Stay Calm, Think Smart, Be Prepared
Step 1: Understand the Importance of Preparedness
Why Urban Survival is Different from Wilderness Survival
When most people think of survival, they imagine being lost in the wilderness, starting a fire with sticks, or hunting for food. While wilderness survival has its own challenges, urban survival is a completely different scenario. It requires a unique set of skills, resources, and strategies.
Key Differences Between Urban and Wilderness Survival:
- Environmental Factors:
- In the wilderness, nature dictates survival—extreme weather, wild animals, and rough terrain.
- In urban settings, survival depends on infrastructure, crowd behavior, and man-made risks such as riots, crime, and collapsing buildings.
- Resources and Scarcity:
- The wilderness offers natural resources like water, wood, and food if you know how to find them.
- Cities depend on supply chains; once disrupted, stores empty fast, utilities fail, and resources become scarce.
- Threats and Dangers:
- In the wild, threats come from the elements, dehydration, and wildlife.
- In a city, dangers include looting, power outages, fires, transportation failures, and potential violence from desperate people.
- Mobility and Shelter:
- In the wild, movement is slower, but shelter can be built using natural materials.
- In a city, movement can be blocked by traffic, damaged roads, or government-imposed curfews, and finding safe shelter can be challenging.
Why This Matters:
Understanding these differences allows you to prepare the right way. If your plan is based only on wilderness survival techniques, it might fail in an urban environment where human behavior, technology, and infrastructure play a significant role.
How Small Disruptions Can Quickly Escalate into Major Crises
Many people assume that urban areas are resilient because of their access to technology, services, and resources. However, cities depend heavily on complex systems that can collapse unexpectedly.
Real-World Examples of Small Disruptions Escalating:
- Power Grid Failures:
- A local blackout can start from a minor technical failure or cyberattack.
- In large-scale power failures, ATMs, gas stations, and water treatment plants stop functioning.
- Without electricity, refrigerated food spoils, medical devices fail, and public services shut down.
- Supply Chain Disruptions:
- A short-term fuel shortage can delay deliveries of food, water, and medicine.
- Panic buying leads to empty supermarket shelves within hours.
- Urban populations rely on daily restocking, making cities extremely vulnerable to supply chain failures.
- Transportation System Breakdowns:
- A transit strike, fuel crisis, or cyberattack on infrastructure can shut down public transportation and roads.
- Emergency services like ambulances and firefighters become delayed or unable to respond.
- People stuck in one place often become easy targets for crime or violence.
- Civil Unrest & Social Breakdown:
- Protests and riots can begin as peaceful demonstrations but escalate into looting and violence.
- Law enforcement gets overwhelmed, leading to areas with no police protection.
- Businesses close, and even emergency services may stop responding.
- Water Supply Contamination:
- A small chemical spill or natural disaster can pollute water sources.
- Without clean water, hospitals, businesses, and households are at immediate risk.
- Within 72 hours, water shortages lead to dehydration, poor sanitation, and disease outbreaks.
Why This Matters:
Urban survival isn’t just about preparing for extreme disasters like war or pandemics. Many emergencies start small but spiral out of control in hours or days. The more you understand how fragile cities are, the better you can prepare in advance.
The “Survival Rule of 3s” (3 Minutes Without Air, 3 Days Without Water, 3 Weeks Without Food)
The Survival Rule of 3s is a simple guideline that helps you prioritize what’s most critical in an emergency.
The Rule Explained:
- 3 Minutes Without Air → Lack of oxygen is the most immediate survival threat.
- 3 Hours Without Shelter (in extreme conditions) → Exposure to cold, heat, or bad weather can kill before dehydration or hunger.
- 3 Days Without Water → Dehydration quickly leads to organ failure and death.
- 3 Weeks Without Food → The body can survive longer without food, but weakness and confusion set in after a few days.
Breaking It Down:
1. Oxygen: The 3-Minute Rule
While rare in everyday life, there are situations where oxygen deprivation becomes a serious threat, such as:
- Smoke inhalation from fires in buildings or public transit.
- Toxic gas leaks in industrial zones or chemical attacks.
- Crowd crushes or stampedes where people are unable to breathe properly.
How to Prepare:
✔️ Learn how to recognize early signs of toxic air or fire hazards.
✔️ Carry a foldable N95 mask or a basic smoke escape mask in your everyday carry (EDC) kit.
✔️ Identify multiple exits when entering crowded places like malls, concerts, or stadiums.
2. Shelter: The 3-Hour Rule
Urban environments can have extreme temperatures that turn deadly, especially during power outages.
- In winter, lack of heating can lead to hypothermia within hours.
- In summer, high temperatures can cause heatstroke, dehydration, and death.
How to Prepare:
✔️ Keep emergency blankets and weather-appropriate clothing in your survival kit.
✔️ Identify safe indoor locations where you can stay warm or cool during a crisis.
✔️ Have a battery-powered fan or hand warmers for extreme weather events.
3. Water: The 3-Day Rule
Water is more critical than food in survival situations. Without it, your body dehydrates rapidly, leading to confusion, organ failure, and death.
How to Prepare:
✔️ Store at least 3-5 liters (1 gallon) per person per day.
✔️ Have multiple ways to purify water (boiling, filters, purification tablets).
✔️ Learn to find water in unexpected places (toilet tanks, water heaters, vending machines).
4. Food: The 3-Week Rule
Food shortages take longer to kill, but within days, low energy and mental fatigue set in. This makes decision-making harder, increasing risk in an emergency.
How to Prepare:
✔️ Stock at least 2 weeks’ worth of non-perishable food.
✔️ Store foods that are nutrient-dense and easy to prepare (nuts, dried fruits, canned goods).
✔️ Learn about alternative food sources (urban foraging, community sharing, bartering).
Final Thoughts on Preparedness
Urban survival isn’t about fear—it’s about being smart and proactive. By understanding how cities break down, you can stay ahead of emergencies, keeping yourself and your loved ones safe.
Key Takeaways:
✅ Urban survival is different from wilderness survival—it’s about people, infrastructure, and supply chains.
✅ Minor disruptions can escalate quickly—always have a backup plan.
✅ The Survival Rule of 3s helps prioritize what matters most—air, shelter, water, then food.
Step 2: Develop Situational Awareness
One of the most critical survival skills in an urban environment is situational awareness—the ability to observe, interpret, and respond to potential threats before they become dangerous. In cities, emergencies don’t always come with clear warnings. Being aware of your surroundings and recognizing early signs of trouble can mean the difference between safety and disaster.
How to Assess Risks in Your City
Every city has unique risks based on its geography, population density, infrastructure, and political climate. Some cities are more prone to natural disasters, while others face risks of civil unrest, crime, or cyberattacks.
Step 1: Identify Common Risks in Your Area
Start by researching the most likely threats in your city. Ask yourself:
✔ What types of natural disasters occur here? (earthquakes, floods, hurricanes, wildfires)
✔ Are there crime hotspots near me? (theft, assaults, gang activity)
✔ How reliable is my city’s infrastructure? (power grid, water supply, emergency services)
✔ Are there ongoing political tensions or protests?
✔ How does my government respond to emergencies? (efficient or slow?)
🔹 Example: If you live in Tokyo, earthquakes are a major risk, so you need an emergency evacuation plan. If you’re in New York, you might focus more on crime awareness and public transit safety.
Step 2: Map Safe and Unsafe Areas
Understanding the layout of your city is essential for planning safe escape routes and avoiding high-risk locations.
✔ Identify key landmarks – police stations, hospitals, fire stations, emergency shelters.
✔ Mark dangerous zones – areas with high crime rates, flood-prone streets, or vulnerable infrastructure.
✔ Plan alternative escape routes – in case main roads or public transport are blocked.
🔹 Example: During the 2019 Hong Kong protests, many people found themselves trapped because they didn’t have alternative routes mapped out when streets were blocked.
Spot Early Warning Signs of Trouble
Most urban emergencies don’t happen instantly. There are usually warning signs if you know what to look for.
Step 3: Monitor Local News and Alerts
✔ Follow trusted news sources – international and local media for updates on security and weather.
✔ Use government alert systems – many cities have emergency apps or SMS alerts for disasters.
✔ Check social media for real-time updates – platforms like Twitter/X can provide faster updates than traditional media.
🔹 Example: In 2021, Texas residents who followed social media alerts were able to prepare for the power grid collapse before the full outage hit.
Step 4: Recognize Changes in Public Behavior
People react instinctively to danger. By observing behavior changes, you can spot trouble before it escalates.
✔ Sudden crowds forming or dispersing → Could indicate protests, police activity, or danger ahead.
✔ People looking fearful or hurried → Suggests something unusual is happening nearby.
✔ Heavy police or military presence → Can indicate a security threat or incoming civil unrest.
✔ Shops closing unexpectedly → Businesses shutting early can signal a coming riot, curfew, or disaster.
🔹 Example: In 2011, during the London riots, many people noticed shopkeepers closing early and police gathering before the riots started. Those who paid attention were able to leave the area before violence erupted.
Step 5: Observe Your Surroundings Like a Professional
✔ Always scan the environment – Look at people’s behavior, exits, blind spots, and obstacles.
✔ Trust your instincts – If something feels “off,” it probably is.
✔ Keep distractions to a minimum – Avoid walking with noise-canceling headphones or being glued to your phone.
🔹 Example: During an active shooter situation, survivors often report that those who were distracted or unprepared were the most vulnerable.
The “OODA Loop” (Observe, Orient, Decide, Act) for Quick Decision-Making
The OODA Loop is a military strategy used to make fast, effective decisions in high-stress situations. Originally developed by US Air Force Colonel John Boyd, this technique helps civilians react quickly in urban emergencies.
Step 6: Apply the OODA Loop in Urban Survival
- Observe → Gather as much information as possible.
- Orient → Analyze the situation and understand what’s happening.
- Decide → Choose the best course of action.
- Act → Execute your decision immediately.
🔹 Example: During a terrorist attack, you don’t have time to panic. You must:
- Observe: Listen for gunfire, explosions, or police sirens.
- Orient: Check exits, avoid large crowds, stay out of sight.
- Decide: Move toward a safe exit or barricade yourself.
- Act: Move fast—hesitation can cost your life.
Final Thoughts on Situational Awareness
✔ Assess risks in your city – Know the dangers before they happen.
✔ Spot early warning signs – Watch news, people, and surroundings for changes.
✔ Use the OODA Loop – Make quick, smart survival decisions under pressure.
Being aware doesn’t mean living in fear—it means being one step ahead.
Step 3: Create a Personalized Survival Plan
Now that you understand the importance of situational awareness, it’s time to take proactive action by creating a personalized survival plan. Unlike generic survival advice, a plan that is tailored to your specific location, risks, and needs will significantly increase your chances of staying safe in an emergency.
A good survival plan answers three key questions:
✔ What are the biggest threats in your area?
✔ Where will you go if disaster strikes?
✔ How will you communicate with your loved ones?
Let’s break these down step by step.
Step 1: Identify Potential Threats in Your Area
Every region has different risks, so the first step is to analyze the specific dangers in your city. While no one can predict the future, you can prepare by understanding historical patterns, geography, and political conditions.
Common Urban Threats
✔ Natural Disasters – Earthquakes, floods, hurricanes, wildfires, tsunamis, extreme cold/heat.
✔ Infrastructure Failures – Power blackouts, gas leaks, water contamination, collapsed buildings.
✔ Civil Unrest – Riots, protests, looting, economic collapse, martial law.
✔ Terrorism and Crime – Active shooters, bombings, hostage situations, cyberattacks.
✔ Pandemics and Health Crises – Disease outbreaks, lack of medical supplies, quarantine measures.
🔹 Example: If you live in California, earthquakes and wildfires should be your top concerns. If you’re in Mumbai, flooding and monsoons are major risks. If you live in a politically unstable country, focus on civil unrest and law enforcement response.
How to Research Risks in Your Area
✔ Check government emergency response websites – Many countries have dedicated disaster preparedness sites.
✔ Look at past events – Research what disasters have happened in your city in the last 50 years.
✔ Use hazard mapping tools – Websites like the UN Disaster Risk Reduction (UNDRR) provide global hazard maps.
✔ Monitor crime statistics – Many cities have crime heat maps showing the most dangerous areas.
✔ Talk to long-term residents – Locals often have insider knowledge of past crises and how people responded.
🔹 Example: Japan has a well-developed earthquake early warning system. If you live there, signing up for alerts is a must.
Step 2: Plan Escape Routes and Emergency Meeting Points
In an emergency, panic and confusion can lead to poor decisions. Having pre-planned escape routes and meeting points will help you and your family avoid danger quickly and efficiently.
How to Plan Safe Escape Routes
✔ Identify multiple exits from your home – Plan at least two ways to leave your house/apartment.
✔ Choose different evacuation routes – Main roads may be blocked, so have alternative paths.
✔ Locate emergency transport options – Know where the nearest bus/train stations are in case roads are unsafe.
✔ Be aware of high-risk areas – Avoid tunnels, bridges, and densely populated streets if possible.
✔ Practice your routes – Walk or drive your escape paths in advance so they become familiar.
🔹 Example: If you live in an apartment, know where the stairwells, fire escapes, and emergency exits are. Elevators may be unsafe in fires or earthquakes.
How to Choose Emergency Meeting Points
In disasters, cell networks often fail, so your family must know exactly where to regroup.
✔ Pick a nearby meeting point – A safe spot within walking distance (park, landmark, friend’s house).
✔ Choose a backup location – If the first spot is inaccessible, have a second location further away.
✔ Select an out-of-town meeting point – If evacuations are required, know where you’ll go.
🔹 Example: In New York City, after 9/11, many families used Central Park as a meeting place when communication networks went down.
Step 3: Set Up a Communication Plan with Family and Friends
If phone lines go down or the internet stops working, how will you contact your loved ones? Having a clear communication plan ensures that everyone stays informed and knows what to do.
Establishing an Emergency Contact System
✔ Create a family emergency group chat – Use WhatsApp, Telegram, or Signal for quick updates.
✔ Have an out-of-town emergency contact – Choose someone outside your city to act as a communication relay.
✔ Use code words for safety updates – If someone is in danger, pre-agree on a message like “I’m visiting Grandma” to signal a problem.
✔ Know local emergency frequencies – Many cities broadcast disaster updates on AM/FM radio.
🔹 Example: During Hurricane Katrina in 2005, many people lost contact for days. Those with out-of-state emergency contacts were able to relay messages through them.
Backup Communication Methods
✔ Emergency radios – A hand-crank or battery-powered radio can receive critical news updates.
✔ Satellite phones – These work even if cell towers are down.
✔ Pre-written note system – If communication fails, leave messages in designated spots for family members.
✔ Meet at a designated information board – In large disasters, communities often set up bulletin boards at shelters.
🔹 Example: After the 2011 Japan earthquake, people used public bulletin boards to leave messages for missing family members.
Finalizing Your Personalized Survival Plan
Now that you have a strong foundation, put everything together into a simple, written survival plan.
✔ Write down your emergency contacts and meeting points.
✔ Save important addresses on paper (not just in your phone).
✔ Print a physical map of your city with routes marked.
✔ Discuss the plan with your family or housemates.
✔ Review and update your plan every six months.
🔹 Example: A well-prepared family in California might have a survival binder that includes:
- Risk assessment (earthquakes, wildfires).
- Escape routes & alternative roads (marked on a city map).
- Meeting points (local park, relative’s house, out-of-town location).
- Emergency contacts (family, out-of-state relatives, local police).
- Pre-arranged check-in messages (e.g., “If I text ‘SAFE-1,’ it means I’m at location 1”).
Final Thoughts on Creating a Survival Plan
✔ Your plan should be simple, clear, and easy to follow.
✔ Involve everyone in your household in the planning process.
✔ Practice your escape routes and communication strategies regularly.
The best survival plan is the one you have ready before disaster strikes.
Step 4: Practice Mental Resilience
Survival is not just about having the right gear—it’s about having the right mindset. No matter how well you prepare, an urban survival situation will test you mentally and emotionally. Fear, panic, and indecision can be just as dangerous as the crisis itself.
This step focuses on building mental resilience, so you can stay calm, make smart decisions, and adapt to rapidly changing situations.
Step 1: Stay Calm Under Pressure with Simple Breathing Techniques
In a crisis, the fight-or-flight response kicks in, causing:
✔ Rapid heartbeat – Your body prepares for action.
✔ Shallow breathing – Less oxygen reaches your brain.
✔ Tunnel vision – You may miss important details.
✔ Panic thinking – Poor decisions are made in haste.
How to Control Your Breathing in a Crisis
Using breathing techniques can quickly calm your nervous system and restore clear thinking. Here are three simple methods:
1. Box Breathing (Used by Special Forces)
✔ Inhale slowly for 4 seconds.
✔ Hold your breath for 4 seconds.
✔ Exhale slowly for 4 seconds.
✔ Hold your breath again for 4 seconds.
✔ Repeat until you feel in control.
🔹 Example: This method is widely used by military personnel and emergency responders to maintain focus under extreme stress.
2. 4-7-8 Breathing (For Immediate Relaxation)
✔ Inhale through your nose for 4 seconds.
✔ Hold the breath for 7 seconds.
✔ Exhale through your mouth for 8 seconds.
✔ Repeat 3–5 times.
🔹 Example: This method is excellent for preventing panic attacks and can be practiced daily.
3. Tactical Grounding (When Overwhelmed)
✔ Name 5 things you see.
✔ Name 4 things you can touch.
✔ Name 3 things you hear.
✔ Name 2 things you smell.
✔ Name 1 thing you taste.
🔹 Example: If caught in a riot or sudden attack, grounding helps you stay aware of your surroundings and make better choices.
Step 2: How to Make Quick, Smart Decisions When Things Go Wrong
In survival situations, hesitation can be deadly. You need to assess danger and act fast without making reckless choices. One proven method is the OODA Loop, used by military strategists and first responders.
Understanding the OODA Loop
✔ Observe – Take in your surroundings. Look for threats, exits, and resources.
✔ Orient – Analyze the situation. What’s happening? Where is the safest path?
✔ Decide – Choose the best course of action based on available information.
✔ Act – Execute your plan immediately before circumstances change.
🔹 Example: If a sudden blackout occurs in a shopping mall:
- Observe – Identify where the emergency exits are and if people are panicking.
- Orient – Decide whether to stay put or move towards an exit.
- Decide – If looting starts, it’s safer to leave immediately.
- Act – Move calmly but quickly before the situation worsens.
How to Train for Quick Decision-Making
✔ Scenario Planning – Imagine possible crises and decide what you’d do in advance.
✔ Mental Rehearsal – Athletes and soldiers use this technique to visualize success in high-stress situations.
✔ Limit Your Choices – Too many options can cause decision paralysis. Choose the top 2-3 actions and commit.
🔹 Example: If you live in a city with frequent protests or strikes, plan:
- Safe alternate routes.
- Where to take cover.
- When to leave vs. when to wait it out.
Step 3: The Importance of Adaptability in a Survival Situation
No survival situation goes exactly as planned. Flexibility and quick thinking are more valuable than having a perfect survival kit.
Why Adaptability Matters
✔ Survival situations are unpredictable – Power grids fail, roads become blocked, supplies run out.
✔ Emotions cloud judgment – Fear can cause freezing or bad choices.
✔ The strongest survivors adapt – Not the ones who stick to rigid plans.
🔹 Example: If your emergency meeting point is unsafe, do you have a backup plan?
How to Develop an Adaptive Mindset
✔ Stay informed – Learn from past crises what worked and what didn’t.
✔ Think creatively – Find multiple solutions to a problem.
✔ Train in different conditions – Don’t just practice at home—simulate different environments.
✔ Be open to changing plans – Rigidity is a survival weakness.
🔹 Example: If a flood blocks your exit route, find higher ground instead of trying to push through.
Final Thoughts on Mental Resilience
✔ Panic leads to mistakes. Control your breathing.
✔ Decision-making must be quick but calculated. Use the OODA Loop.
✔ Survival favors the adaptable. Be ready to change your plan.
By mastering mental resilience, you’re giving yourself the best possible chance to survive and protect your loved ones in an urban crisis.
We’re also giving these extra bonuses
Urban Survival Prepping – Checklist
Urban Survival Prepping – FAQs
Urban Survival Prepping – Salespage Content

Package Details:
Word Count: 19 014 Words
Number of Pages: 95
Urban Survival Prepping – Bonus Content
Checklist
Word Count: 965 words
FAQs
Word Count: 940 words
Salespage Content
Word Count: 601 words
Total Word Count: 21 520 Words
Your PLR License Terms
PERMISSIONS: What Can You Do With These Materials?
Sell the content basically as it is (with some minor tweaks to make it “yours”).
If you are going to claim copyright to anything created with this content, then you must substantially change at 75% of the content to distinguish yourself from other licensees.
Break up the content into small portions to sell as individual reports for $10-$20 each.
Bundle the content with other existing content to create larger products for $47-$97 each.
Setup your own membership site with the content and generate monthly residual payments!
Take the content and convert it into a multiple-week “eclass” that you charge $297-$497 to access!
Use the content to create a “physical” product that you sell for premium prices!
Convert it to audios, videos, membership site content and more.
Excerpt and / or edit portions of the content to give away for free as blog posts, reports, etc. to use as lead magnets, incentives and more!
Create your own original product from it, set it up at a site and “flip” the site for megabucks!
RESTRICTIONS: What Can’t You Do With These Materials?
To protect the value of these products, you may not pass on the rights to your customers. This means that your customers may not have PLR rights or reprint / resell rights passed on to them.
You may not pass on any kind of licensing (PLR, reprint / resell, etc.) to ANY offer created from ANY PORTION OF this content that would allow additional people to sell or give away any portion of the content contained in this package.
You may not offer 100% commission to affiliates selling your version / copy of this product. The maximum affiliate commission you may pay out for offers created that include parts of this content is 75%.
You are not permitted to give the complete materials away in their current state for free – they must be sold. They must be excerpted and / or edited to be given away, unless otherwise noted. Example: You ARE permitted to excerpt portions of content for blog posts, lead magnets, etc.
You may not add this content to any part of an existing customer order that would not require them to make an additional purchase. (IE You cannot add it to a package, membership site, etc. that customers have ALREADY paid for.)
Share Now!
Latest Products


Free Sales Funnel Builder

Related Products
Popular & Trending


Featured Products