Profitable Blogging PLR Course 26k Words
in Blogging PLR , Blogging PLR Ebooks , PLR Checklists , PLR eBooks , PLR eCourses , PLR List Building Reports , Premium PLR , Premium PLR eBooks , Premium PLR Packages , Premium PLR Reports , Premium White Label Brandable PLR Coaching Courses , Private Label Rights ProductsChoose Your Desired Option(s)
has been added to your cart!
have been added to your cart!
#profitableblogging #bloggingplr #plrcourse #makemoneyblogging #bloggingsuccess #passiveincome #digitalmarketing #bloggingtips #seoforblogging #plrcontent #bloggingstrategies
Profitable Blogging PLR Course – Turn Your Blog Into a Money-Making Machine!
Are you ready to turn your blog into a profitable online business? Whether you’re a beginner starting from scratch or an experienced blogger looking to boost your income, the Profitable Blogging PLR Course is your step-by-step guide to making money with blogging.
This comprehensive course teaches everything from setting up a blog to creating engaging content, driving traffic, and monetizing effectively. With easy-to-follow lessons and actionable strategies, you’ll learn how to build a blog that not only attracts readers but also generates consistent passive income.
Presenting…
Profitable Blogging PLR Course 26k Words
What’s Inside the Profitable Blogging Course?
Module 1: Laying the Foundation for a Profitable Blog
The first step to making money with blogging is setting up the right foundation.
- Choose a Profitable Niche – Discover which blog topics are in demand and how to pick one that aligns with your interests and business goals.
- Create a Blog Website – Learn how to set up a blog on WordPress, select a clean design, and optimize it for success.
- Domain & Hosting Setup – Find the perfect domain name and reliable hosting service for a professional and fast-loading blog.
- Essential Blog Plugins – Install key plugins for SEO, performance, and social media integration to enhance user experience.
Module 2: Writing Engaging Content That Converts
A successful blog thrives on high-quality, engaging content. This module will show you how to create posts that attract readers and drive action.
- Identify Your Target Audience – Learn how to write blog content that speaks directly to your ideal reader.
- Craft Click-Worthy Headlines – Master the art of writing irresistible blog titles that boost click-through rates.
- Write High-Value Content – Learn how to create blog posts that educate, entertain, and engage.
- Use Visuals for Better Engagement – Find out how to use images, infographics, and videos to enhance readability.
Module 3: Growing Your Blog’s Traffic
Traffic is the lifeblood of a profitable blog. In this module, you’ll learn proven strategies to grow your audience.
- SEO Optimization for Blog Posts – Discover how to rank higher on Google and attract organic traffic.
- Social Media Promotion – Leverage Facebook, Twitter, Instagram, and Pinterest to drive visitors to your site.
- Networking with Other Bloggers – Learn how to collaborate, guest post, and build relationships in your niche.
- Building an Email List – Capture leads and build a loyal audience with email marketing.
Module 4: Monetizing Your Blog
Now comes the exciting part—turning your blog into a money-making machine!
- Affiliate Marketing – Promote relevant products and earn commissions for every sale made through your links.
- Sponsored Content & Brand Collaborations – Get paid to write blog posts and reviews for companies.
- Creating Digital Products – Learn how to sell eBooks, online courses, and printables for passive income.
- Setting Up Ads for Blog Revenue – Discover how to monetize with Google AdSense, Mediavine, and other ad networks.
Module 5: Scaling and Automating Your Blog Business
Once your blog is generating income, it’s time to scale and automate for long-term success.
- Track Performance & Optimize – Use Google Analytics to understand your audience and improve content strategy.
- Outsource for Efficiency – Learn how to hire writers, designers, and VA’s to streamline operations.
- Content Repurposing Strategies – Turn your blog posts into YouTube videos, podcasts, or social media content.
- Experiment with New Income Streams – Explore membership sites, subscription-based content, and webinars.
Why Choose This PLR Course?
This Profitable Blogging PLR Course is fully customizable and packed with high-quality, ready-to-use content. Here’s how you can use and profit from it:
✔️ Sell It As Your Own Course – Rebrand it, tweak it, and sell it as a premium blogging course.
✔️ Use It for Coaching & Training – Provide expert guidance to your audience and clients.
✔️ Break It into Smaller Reports – Sell individual lessons as blog post bundles or mini-guides.
✔️ Create an Email Course or Lead Magnet – Offer it as a freebie to grow your email list.
✔️ Bundle It with Other Blogging Resources – Increase value by packaging it with other digital products.
What You Get with This PLR Course:
✅ Full Course Content – 25,136 words of detailed training on profitable blogging strategies.
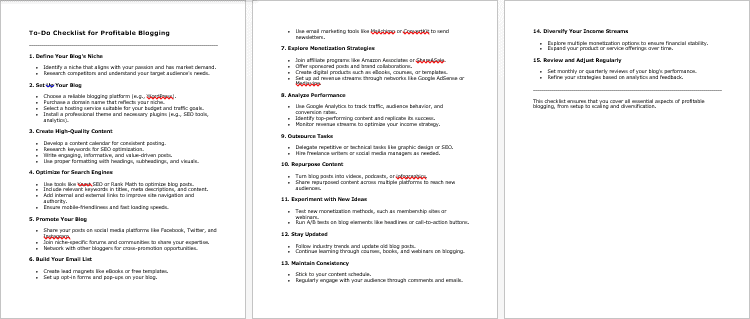
✅ Profitable Blogging Checklist – A step-by-step guide to keep learners on track.
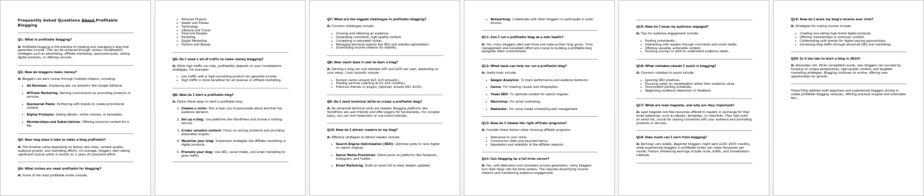
✅ FAQs Document – Address common blogging questions and concerns.
✅ Done-for-You Sales Page – Ready-to-use sales copy to market the course instantly.
License Terms – What You Can & Can’t Do
✔️ What You Can Do:
- Sell the content as is or customize it with your branding.
- Package it as a paid course or include it in a membership site.
- Turn it into blog posts, reports, videos, or lead magnets.
- Use it for client coaching and training programs.
❌ What You Can’t Do:
- Resell PLR rights or give it away for free in its entirety.
- Offer 100% commission on affiliate sales.
- Add it to free products, bundles, or memberships without requiring a purchase.
Ready to Start Earning from Blogging?
With the Profitable Blogging PLR Course, you have everything you need to teach, market, and profit from blogging. No need to spend hours creating content from scratch—this course is ready to go!
👉 Get instant access today and start making money with blogging!
has been added to your cart!
have been added to your cart!
Here A Sample of Profitable Blogging PLR Course
Welcome to the “Profitable Blogging” course! Whether you’re just starting out or looking to grow your existing blog, this course is designed to guide you through each step of turning your blog into a profitable venture. Let’s dive right in!
Module 1: Setting Up for Success
Step 1: Choose Your Niche
Choosing the right niche is one of the most important decisions you’ll make when starting your blog. It sets the foundation for everything that follows, from the type of content you create to how you’ll attract and engage your audience. In this step, we’ll explore how to choose a niche that both excites you and has the potential to become profitable in the long run. Follow these detailed instructions to ensure you’re on the right path.
1. Identify Your Passions and Interests
To create a blog that you enjoy working on, it’s essential to choose a niche that aligns with your personal passions and interests. Starting a blog is a long-term commitment, and the more excited you are about the subject, the easier it will be to stay motivated.
- Action: Sit down and make a list of topics that excite you. These could be things you already know a lot about or areas that you would love to dive deeper into. Think about what you can talk about for hours, what you love reading or learning about, or the hobbies you enjoy. For example, you might be passionate about travel, food, fitness, business, personal development, or even niche hobbies like gardening or tech gadgets.
- Questions to ask yourself:
- What am I truly passionate about?
- What topics do I read about in my free time?
- What are the activities or subjects that make me lose track of time when I engage with them?
The key here is to find a topic you can talk about for years without getting bored. A niche you love will make the process of creating content, engaging with your audience, and growing your blog feel more like a rewarding journey than a task.
2. Evaluate the Market Demand
While choosing a niche you love is crucial, it’s also important to ensure that there’s a market demand for it. Even if you are passionate about a topic, it won’t generate income unless there are people actively searching for information, products, or services related to that niche.
- Action: Use tools like Google Trends, keyword research tools (such as SEMrush, Ahrefs, or Ubersuggest), and social media platforms to gauge the popularity of your chosen niche. These tools can help you identify how many people are actively searching for the topics you’re interested in. Look for trends, questions, and topics that people are discussing or seeking solutions to.
- Questions to ask yourself:
- Are people searching for information related to this niche online? (Use Google search to check).
- Are there active communities or forums discussing this topic? (Check Reddit, Facebook groups, or specialized forums).
- Is the topic something that people are spending money on? (Look for product sales, online courses, or services in your niche).
- What is the search volume for the main keywords in this niche? (Check with keyword research tools).
The goal is to ensure that there’s a healthy demand for your topic, so people will find your blog and be interested in the content you create.
3. Assess the Competition
Once you’ve identified a niche with both passion and market demand, you need to assess the competition within that niche. A competitive niche can be both an opportunity and a challenge. While a high level of competition shows that there’s a demand, it also means you’ll have to find a way to stand out.
- Action: Research the top blogs and websites in your chosen niche. Evaluate their content, audience engagement, and the monetization strategies they use. This will help you understand the existing landscape and figure out what gaps you can fill.
- Questions to ask yourself:
- Who are the top competitors in my niche, and how established are they?
- What kind of content are they creating, and how can I create something better or different?
- What is their approach to monetization? (Do they use affiliate marketing, sell digital products, offer services, etc.?)
- How is the audience engaging with their content? (Check comments, social shares, or email lists).
If the competition is fierce, that’s okay—it just means you’ll need to carve out your own unique space. This could involve offering a unique perspective, diving deeper into subtopics, or targeting a specific segment of the audience that’s underserved.
4. Define Your Target Audience
The next step in choosing your niche is to clearly define your target audience. Understanding who your audience is will guide your content creation, marketing efforts, and even the monetization strategies you choose. A well-defined audience will help you create content that speaks directly to their needs, challenges, and desires.
- Action: Think about the type of person who would benefit from your content. Consider factors such as age, gender, location, profession, interests, challenges, and goals. You can also use analytics tools like Facebook Audience Insights, Instagram Insights, and Google Analytics to gather more information about potential audience demographics.
- Questions to ask yourself:
- Who will benefit the most from the content I create?
- What are the common problems or challenges my target audience faces?
- What are their goals, desires, and pain points?
- Where do they hang out online? (Social media platforms, forums, blogs, etc.)
Understanding your target audience helps you create highly relevant content and connect with the right people. The more specific you can be, the better. For example, instead of a broad topic like “fitness,” focus on a niche within it, like “fitness for busy professionals” or “yoga for mental health.”
5. Evaluate the Profit Potential
Finally, ensure that your chosen niche has profit potential. While passion and demand are important, your blog needs to generate income in order to be sustainable in the long run. There are many ways to monetize a blog, from affiliate marketing to selling your own products or services.
- Action: Research how other bloggers in your niche are making money. Look at different income streams like affiliate marketing, sponsored posts, selling digital products, offering services, or even creating paid membership communities.
- Questions to ask yourself:
- Can I monetize this niche effectively? (Look at the types of products or services that are already being sold).
- Are there affiliate programs available in this niche?
- Can I create and sell my own products (e.g., eBooks, courses, or physical products)?
- Is there room to grow into high-ticket products or services?
Ensure that your niche can support at least a few different monetization options. The more income streams you can tap into, the more profitable your blog will be.
Conclusion:
Choosing the right niche for your blog is not just about picking a topic you love, but also about understanding the market demand, competition, audience, and profit potential. By following these steps—identifying your passions, evaluating demand, researching competition, defining your audience, and assessing profitability—you’ll be on the path to creating a successful and profitable blog. Take your time to research and carefully evaluate your options before settling on a niche, as it will significantly impact the success of your blog.
Step 2: Create a Blog Website
Once you’ve chosen your niche, the next step is to create a blog website where you can start sharing your content with the world. This is where the magic happens. A well-designed, professional-looking website not only makes your blog more appealing but also helps establish your authority and builds trust with your audience. In this step, we’ll walk through how to set up your blog on a reliable platform like WordPress or Wix, and how to choose a design that aligns with your niche and attracts readers.
1. Choose a Blogging Platform: WordPress or Wix
The first step in building your blog is selecting the right platform. There are many blogging platforms available, but for most international course creators, WordPress and Wix are the top choices. Let’s break down both options:
- WordPress
WordPress is the most popular and powerful blogging platform in the world. It’s highly customizable, offers a vast range of themes and plugins, and gives you full control over your website. If you want to build a professional blog that can grow into a business, WordPress is your best bet.- How to Choose WordPress:
- It’s ideal for bloggers who want control over every aspect of their site.
- It requires hosting and a domain name (which we’ll discuss in the next step).
- WordPress.org is open-source, meaning it’s free to use, but you’ll need to pay for hosting and other tools.
- How to Choose WordPress:
- Wix
Wix is a website builder that offers an easy drag-and-drop interface, making it simple for beginners to build a website without technical skills. It’s a good choice if you want a website up quickly without worrying about hosting, security, or other technical details.- How to Choose Wix:
- Perfect for bloggers who want a quick and straightforward setup.
- Offers built-in hosting and free themes.
- Provides less customization than WordPress, but it is much easier to use for beginners.
- How to Choose Wix:
Action: Choose the platform that aligns with your needs. If you want full control and are willing to invest time in learning, WordPress is the better choice. If you prefer a simpler, faster setup, Wix is a great option.
2. Choose and Register a Domain Name
Your domain name is the address of your blog on the internet. It’s essential to pick a domain name that reflects your niche and is easy to remember. Your domain name should also be unique, professional, and easy to spell.
- Action:
- Brainstorm a few ideas that are simple, clear, and relevant to your niche.
- Make sure the name is memorable and easy to type.
- Check availability on domain registration platforms like GoDaddy, Namecheap, or through your hosting provider (for WordPress users).
- Avoid long, complex, or overly generic names. Ideally, your domain name should be between 6-15 characters.
Tips for choosing a domain name:
- Keep it short and sweet.
- Use keywords relevant to your niche (e.g., if your blog is about fitness, include “fit” or “health” in the name).
- Avoid numbers and hyphens, as they can be confusing.
Once you’ve decided on a name and it’s available, you can register it for an annual fee.
3. Select a Hosting Provider (For WordPress Users)
If you choose WordPress as your blogging platform, the next step is to choose a hosting provider. Hosting is where your website files are stored and made accessible to your audience online.
- Action:
- Choose a hosting provider based on performance, customer support, and scalability. Some popular hosting providers for WordPress include Bluehost, SiteGround, and HostGator. These providers offer easy WordPress integration, great uptime, and customer support.
- Look for a hosting plan that suits your needs. If you’re just starting, a basic shared hosting plan will suffice, but as your blog grows, you may need to upgrade to a more powerful option (e.g., VPS or managed WordPress hosting).
Steps to set up hosting:
- Choose a hosting provider and sign up for an account.
- Pick a hosting plan that fits your budget and goals.
- During checkout, you can register your domain (if you haven’t already done so).
- Follow the setup instructions provided by the host to install WordPress automatically or manually.
For Wix users, hosting is included in their plans, so you won’t need to worry about this step.
4. Install and Set Up Your Blog (WordPress Setup)
Once your domain and hosting are set up, the next step is to install WordPress and configure your blog. If you’ve chosen a hosting provider like Bluehost, they offer a one-click WordPress installation process that makes this very easy.
- Action:
- Log into your hosting account and find the option for installing WordPress (usually found in the control panel under “1-click installs” or similar).
- Once WordPress is installed, go to your website’s admin area by visiting www.yourdomain.com/wp-admin and log in using the credentials you created during installation.
- You’ll be taken to your WordPress dashboard, where you can start customizing your blog.
Tips for WordPress users:
- Set your site title and tagline: Go to Settings > General to set your blog’s name and tagline.
- Adjust your permalink structure: Go to Settings > Permalinks and select the option “Post name” to create clean and SEO-friendly URLs.
- Install essential plugins: Install key plugins like Yoast SEO for search engine optimization, Akismet for spam protection, and Jetpack for enhanced functionality.
For Wix users, once you’ve signed up, you can use the Wix editor to start designing your site.
5. Choose a Clean, User-Friendly Design
Your blog’s design plays a crucial role in attracting and retaining visitors. A clean, professional, and user-friendly design enhances user experience, encourages visitors to explore more, and helps your content stand out. Choose a theme that suits your niche and offers flexibility for customization.
- Action:
- WordPress: Choose a responsive, mobile-friendly theme from the WordPress theme directory or third-party theme marketplaces (e.g., ThemeForest). Consider themes that are specifically designed for bloggers or content creators.
- Wix: Browse through Wix’s wide range of pre-designed templates. Wix offers industry-specific templates, so you can find a design tailored to your niche.
- Customize your theme: Once you’ve chosen a theme, go to the WordPress Customizer (Appearance > Customize) or the Wix editor to tweak colors, fonts, layout, and logo to match your brand.
- WordPress: Choose a responsive, mobile-friendly theme from the WordPress theme directory or third-party theme marketplaces (e.g., ThemeForest). Consider themes that are specifically designed for bloggers or content creators.
Tips for choosing a blog design:
- Keep it simple and clean. Avoid cluttered designs that can overwhelm visitors.
- Ensure the theme is mobile-friendly, as many users will visit your blog on mobile devices.
- Choose fonts and colors that align with your brand and are easy to read.
- Prioritize navigation. Make sure visitors can easily find your content and contact information.
6. Create Essential Pages for Your Blog
Now that your design is in place, it’s time to set up essential pages that will help you provide value to your visitors and establish trust.
- Action:
- Home page: This is where visitors will land when they visit your blog. Make sure it’s clear, welcoming, and highlights the most important sections of your blog.
- About page: Share who you are, what your blog is about, and why people should follow your content. This page is essential for building trust with your audience.
- Contact page: Allow visitors to reach out to you. You can include an email address, a contact form, or even links to your social media profiles.
- Privacy Policy and Terms of Service: If you’re collecting any personal data (such as email addresses for your newsletter), you must have a privacy policy in place. Many hosting providers have free templates you can customize.
- Home page: This is where visitors will land when they visit your blog. Make sure it’s clear, welcoming, and highlights the most important sections of your blog.
Conclusion:
Creating a blog website is the foundation of your blogging journey. By choosing the right platform, selecting a suitable domain, and creating a user-friendly, professional design, you’re setting yourself up for success. Whether you opt for WordPress or Wix, focus on creating an intuitive, engaging, and well-structured blog that reflects your niche and builds a connection with your audience. The next step will be to start crafting content that attracts and engages your readers, but for now, you’re on your way to having a blog that’s ready to grow and prosper.
Step 3: Pick a Domain Name & Hosting In this step, you will set the foundation for your blog’s identity by choosing a memorable domain name and selecting a reliable hosting provider. These elements are vital for the success of your blog. Your domain name serves as the address of your blog on the internet, while hosting is the service that stores your website files and makes them accessible to visitors around the world. Let’s walk through the process step by step to help you choose wisely and ensure your blog’s future growth.
We’re also giving these extra bonuses
Profitable Blogging – Checklist
Profitable Blogging – FAQs
Profitable Blogging – Salespage Content

Package Details:
Word Count: 25 136 Words
Number of Pages: 100
Profitable Blogging – Bonus Content
Checklist
Word Count: 445 words
FAQs
Word Count: 911 words
Salespage Content
Word Count: 618 words
Total Word Count: 27 110 Words
Your PLR License Terms
PERMISSIONS: What Can You Do With These Materials?
Sell the content basically as it is (with some minor tweaks to make it “yours”).
If you are going to claim copyright to anything created with this content, then you must substantially change at 75% of the content to distinguish yourself from other licensees.
Break up the content into small portions to sell as individual reports for $10-$20 each.
Bundle the content with other existing content to create larger products for $47-$97 each.
Setup your own membership site with the content and generate monthly residual payments!
Take the content and convert it into a multiple-week “eclass” that you charge $297-$497 to access!
Use the content to create a “physical” product that you sell for premium prices!
Convert it to audios, videos, membership site content and more.
Excerpt and / or edit portions of the content to give away for free as blog posts, reports, etc. to use as lead magnets, incentives and more!
Create your own original product from it, set it up at a site and “flip” the site for megabucks!
RESTRICTIONS: What Can’t You Do With These Materials?
To protect the value of these products, you may not pass on the rights to your customers. This means that your customers may not have PLR rights or reprint / resell rights passed on to them.
You may not pass on any kind of licensing (PLR, reprint / resell, etc.) to ANY offer created from ANY PORTION OF this content that would allow additional people to sell or give away any portion of the content contained in this package.
You may not offer 100% commission to affiliates selling your version / copy of this product. The maximum affiliate commission you may pay out for offers created that include parts of this content is 75%.
You are not permitted to give the complete materials away in their current state for free – they must be sold. They must be excerpted and / or edited to be given away, unless otherwise noted. Example: You ARE permitted to excerpt portions of content for blog posts, lead magnets, etc.
You may not add this content to any part of an existing customer order that would not require them to make an additional purchase. (IE You cannot add it to a package, membership site, etc. that customers have ALREADY paid for.)
Share Now!
Latest Products

Free Sales Funnel Builder

Related Products
Popular & Trending


Featured Products