Natural Skin Care PLR Course 29k Words
in Health PLR , Health PLR eBooks , PLR Checklists , PLR eBooks , PLR eCourses , PLR List Building Reports , Premium PLR , Premium PLR eBooks , Premium PLR Reports , Premium White Label Brandable PLR Coaching Courses , Private Label Rights Products , Skin Care PLRChoose Your Desired Option(s)
has been added to your cart!
have been added to your cart!
#skincare #naturalbeauty #wellnessplr #beautycontent #healthplr #skincaretips #plrcourse #contentmarketing #holisticbeauty #plrcontent
Natural Skin Care PLR Course – Build Your Business While Teaching the Secrets of Healthy, Glowing Skin
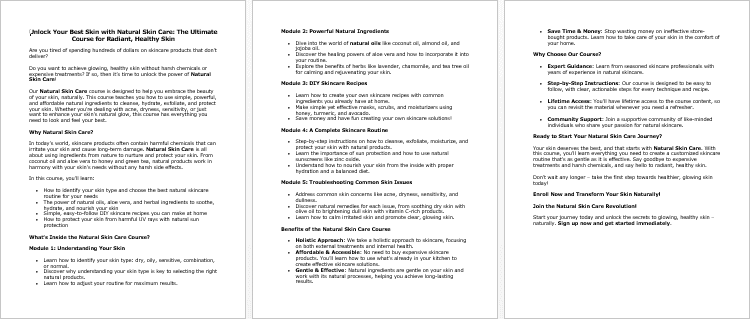
Unlock the transformative power of natural skincare and start building a profitable online business with our Natural Skin Care PLR Course. This comprehensive, done-for-you course provides everything you need to teach, sell, or repurpose content around natural skin care, helping your audience achieve healthy, radiant skin without harsh chemicals.
Whether you’re a digital entrepreneur, blogger, coach, or wellness professional, this PLR course gives you the tools to educate, inspire, and profit in the booming beauty and self-care niche.
With 27,096 words of actionable, step-by-step guidance, you’ll have a complete course ready to sell, rebrand, or repurpose into multiple products.
Presenting…
Natural Skin Care PLR Course 29k Words
📌 What is the Natural Skin Care PLR Course?
The Natural Skin Care PLR Course is designed to teach people how to care for their skin naturally while providing you with a fully editable, high-quality PLR package.
This course is ideal for:
- Health and wellness coaches looking to offer online courses.
- Bloggers and content creators building authority in beauty and self-care.
- Digital entrepreneurs creating eBooks, guides, and membership content.
- Anyone interested in profiting from the growing natural skincare trend.
With this course, your customers will learn to:
- Identify their skin type.
- Harness the benefits of natural ingredients.
- Build personalized skincare routines.
- Solve common skin issues naturally.
- Maintain a lifestyle that promotes glowing skin from within.
📚 What’s Inside the Course
The Natural Skin Care PLR Course contains five detailed modules covering all aspects of natural skincare.
Module 1: Understanding Your Skin Type
Knowing your skin type is the first step to creating an effective skincare routine. This module teaches your customers how to:
- Identify their skin type: oily, dry, combination, or sensitive.
- Understand why skin type matters: choose natural products tailored to their needs.
- Test their skin: observe reactions to climate, diet, and stress.
- Adjust their routine: use oils, creams, or lighter formulas based on their skin’s behavior.
Module 2: The Power of Natural Ingredients
Natural ingredients can nourish, repair, and protect the skin. In this module, your customers will learn to:
- Discover natural oils: coconut, almond, and jojoba oils for hydration and nourishment.
- Harness aloe vera: soothe and repair skin naturally with antioxidant-rich aloe vera gel.
- Explore herbal remedies: tea tree, lavender, and chamomile for calming and anti-inflammatory effects.
- DIY skincare recipes: create masks, scrubs, and treatments with kitchen staples like honey, turmeric, and avocado.
Module 3: Building a Daily Skin Care Routine
A consistent routine is key to healthy skin. This module covers:
- Cleansing gently: remove impurities without stripping natural oils.
- Exfoliating naturally: oatmeal and sugar scrubs for smooth, fresh skin.
- Hydrating and moisturizing: use shea butter, rose water, or oils for lasting hydration.
- Protecting with sunscreen: natural options like zinc oxide to shield skin from harmful UV rays.
Module 4: Natural Remedies for Common Skin Issues
From acne to sensitive skin, this module offers practical solutions using natural remedies:
- Fight acne naturally: tea tree oil and honey for clearer skin.
- Soothe dry skin: olive oil and avocado masks for deep hydration.
- Calm sensitive skin: aloe vera and chamomile to reduce irritation.
- Brighten dull skin: lemon juice, turmeric, and vitamin C-rich ingredients for a radiant glow.
Module 5: Living a Skin-Healthy Lifestyle
Healthy skin starts from within. This module teaches:
- Hydrate from within: proper water intake and herbal teas to maintain moisture.
- Eat skin-nourishing foods: antioxidants, vitamins, and minerals from berries, nuts, and greens.
- Get enough sleep: improve cell regeneration for naturally glowing skin.
- Manage stress: meditation, yoga, and relaxation techniques to prevent skin issues.
Course Wrap-Up: After completing the modules, your customers will be empowered to build a personalized skincare routine that suits their lifestyle and skin type. Consistency, experimentation, and the right natural ingredients are key to achieving healthy, radiant skin.
🎁 Bonus Materials
To make this PLR package even more valuable, it includes:
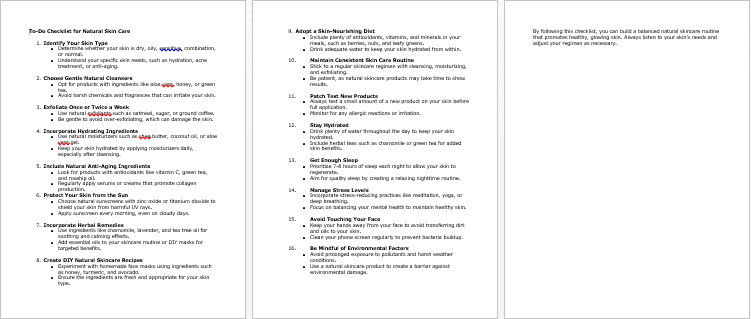
- Natural Skin Care Checklist (520 words): Step-by-step reminders for a complete routine.
- Natural Skin Care FAQs (1,237 words): Answer common questions your customers may have.
- Natural Skin Care Sales Page (763 words): Ready-to-use copy to promote your course immediately.
💡 How You Can Use and Profit from This Course
The Natural Skin Care PLR Course offers numerous monetization strategies:
- Sell the full course as-is: Minor tweaks make it fully branded under your name.
- Break it into reports or eBooks: Sell individual modules for $10–$20 each.
- Bundle with other content: Create packages priced at $47–$97.
- Create a membership site: Offer monthly access for recurring revenue.
- Build an e-class: Charge $297–$497 for multiple-week online classes.
- Convert to audio or video: Create premium courses or digital products.
- Lead magnets: Use excerpts for blog posts, reports, or email incentives.
- Flip a website: Build a complete site around this course and sell it for profit.
This PLR content is a ready-made business-in-a-box that allows you to save time, scale quickly, and enter the profitable beauty niche without starting from scratch.
🔑 License Terms
Permissions:
- Resell, rebrand, or repurpose the content.
- Break content into smaller products or reports.
- Use in membership sites, courses, or premium packages.
- Convert to audio, video, or other digital formats.
Restrictions:
- Cannot pass PLR rights to your customers.
- Cannot give away the full course for free.
- Cannot allow unlimited affiliate commissions (max 75%).
- Cannot add this content to existing orders without additional purchase.
✅ Why You Need This PLR Course
- Complete, ready-to-use course on a trending and profitable topic.
- 27,096 words of high-quality content for beginners and enthusiasts.
- Multiple monetization options to fit your business model.
- Fully editable and customizable for your brand.
- Includes bonuses such as checklists, FAQs, and a sales page.
This PLR course gives you everything you need to educate your audience, provide value, and profit from the booming natural skincare industry.
🛒 Get Your Natural Skin Care PLR Course Today
Start building your digital products, online courses, and membership sites in the beauty niche with a complete done-for-you course.
With the Natural Skin Care PLR Course, you get:
- 27,096 words of high-quality content
- Editable checklists, FAQs, and sales page
- Multiple monetization options for maximum profit
- A ready-made course in a growing and lucrative niche
Don’t wait—claim your copy today and start teaching the secrets to naturally healthy skin while building your profitable online business!
has been added to your cart!
have been added to your cart!
Here A Sample of Natural Skin Care PLR Course
Module 1: Understanding Your Skin Type
This module will help you determine what kind of skin you have, so you can personalize your skincare routine.
Step 1: Know Your Skin Type
Introduction: The first step in building an effective skincare routine is understanding your skin type. Knowing whether your skin is oily, dry, combination, or sensitive is the foundation upon which you can choose the right skincare products and develop a personalized skincare regimen. This step will help you identify your skin’s natural tendencies, allowing you to select products that nourish and balance your skin, avoiding irritation or product misuse.
This step-by-step process will guide you through determining your skin type, so you can adjust your skincare routine to your skin’s specific needs.
Step 1.1: Cleanse Your Face Gently
Before determining your skin type, it is essential to remove any impurities, oils, or makeup that may alter how your skin feels. Use a mild, non-stripping cleanser that is suitable for your skin. Harsh cleansers can distort your skin’s natural balance, making it harder to assess its true type.
Instructions:
- Choose a Gentle Cleanser: Select a cleanser that is free from harsh chemicals or fragrances. Look for natural cleansers with ingredients like aloe vera, chamomile, or glycerin that hydrate and soothe without causing irritation.
- Use Lukewarm Water: Avoid using hot or cold water to wash your face. Hot water can strip natural oils, and cold water may not cleanse effectively. Lukewarm water is the ideal temperature to ensure that you cleanse without damaging your skin’s natural barrier.
- Apply Cleanser in Circular Motions: Gently massage the cleanser into your skin using circular motions for about 20-30 seconds. Focus on the T-zone (forehead, nose, and chin) and other areas that are prone to oil build-up or dryness.
- Rinse Thoroughly: Rinse your face thoroughly with lukewarm water to remove any cleanser residue.
- Pat Dry: Use a soft, clean towel to gently pat your face dry. Avoid rubbing your face, as this can cause irritation or discomfort.
Step 1.2: Wait for 1 Hour and Let Your Skin Settle
After washing your face, it’s essential to let your skin return to its natural state. Applying moisturizers, serums, or toners immediately after cleansing may mask how your skin feels without any products. The goal is to assess how your skin behaves in its natural form, without external products influencing the results.
Instructions:
- Resist the Urge to Apply Products: After cleansing, allow your skin to breathe for at least 1 hour. This period will help you understand the natural characteristics of your skin.
- Focus on the Sensations: While waiting, avoid touching your face. Focus on how your skin feels as the hour progresses. Take note of any immediate changes in your skin’s appearance or texture.
- Observe the Following Key Factors:
- Dryness: Does your skin feel tight, rough, or flaky? Does it appear dull and lack radiance?
- Oiliness: Do you notice any shine, particularly in the T-zone (forehead, nose, and chin)?
- Combination Skin: Does your skin feel dry in some areas (usually the cheeks) but oily in others (especially the T-zone)?
- Sensitivity: Do you feel any irritation, redness, or stinging sensations on certain areas of your face?
- Dryness: Does your skin feel tight, rough, or flaky? Does it appear dull and lack radiance?
Step 1.3: Assess the Different Areas of Your Face
Now that you’ve allowed your skin to settle, it’s time to analyze its behavior in different areas of your face. Most people’s skin is not uniform across the entire face, so it’s essential to observe how each region of your face feels.
Instructions:
- T-Zone (Forehead, Nose, Chin):
- Oily Skin: If your skin feels greasy, shiny, or you notice enlarged pores in these areas, you likely have oily skin in the T-zone.
- Combination Skin: If the T-zone feels oily but the rest of your face feels normal or dry, it’s a sign of combination skin.
- Dry Skin: If the T-zone feels tight or flaky, this might indicate dry skin in that area.
- Oily Skin: If your skin feels greasy, shiny, or you notice enlarged pores in these areas, you likely have oily skin in the T-zone.
- Cheeks and Jawline:
- Dry Skin: If your cheeks and jawline feel tight, dry, or rough, this may indicate dry skin.
- Combination Skin: If your cheeks feel normal or slightly dry but the T-zone is oily, this could be combination skin.
- Sensitive Skin: If your cheeks feel irritated, red, or sensitive to touch, your skin might be sensitive.
- Dry Skin: If your cheeks and jawline feel tight, dry, or rough, this may indicate dry skin.
- Under-Eye Area:
- Dry Skin: Dryness in the under-eye area may lead to fine lines and a rough texture.
- Oily Skin: If your under-eye area feels greasy, it might indicate that the skin is overproducing oil.
- Sensitive Skin: If you experience redness or irritation, you may have sensitive skin around the eyes.
- Dry Skin: Dryness in the under-eye area may lead to fine lines and a rough texture.
Step 1.4: Analyze and Identify Your Skin Type
Now that you’ve cleansed your face and observed how your skin behaves, you can begin to identify your skin type. Take your observations from the previous steps and categorize your skin according to its predominant traits.
Skin Types Overview:
- Oily Skin:
- Characteristics: Your skin feels greasy, especially in the T-zone (forehead, nose, chin). Pores may appear enlarged, and you might experience frequent breakouts or blackheads due to excess sebum (oil) production.
- Care Tips: Opt for oil-free, non-comedogenic (non-pore-clogging) products. Choose lightweight moisturizers and gentle foaming cleansers to remove excess oil without over-drying the skin.
- Characteristics: Your skin feels greasy, especially in the T-zone (forehead, nose, chin). Pores may appear enlarged, and you might experience frequent breakouts or blackheads due to excess sebum (oil) production.
- Dry Skin:
- Characteristics: Your skin feels tight, rough, and sometimes flaky or scaly. It may appear dull, and fine lines may be more noticeable. Dry skin lacks moisture and can feel uncomfortable, especially after cleansing.
- Care Tips: Choose hydrating products such as creamy cleansers, rich moisturizers, and oils that lock in moisture. Look for ingredients like hyaluronic acid, shea butter, and glycerin to hydrate and restore the skin’s moisture balance.
- Characteristics: Your skin feels tight, rough, and sometimes flaky or scaly. It may appear dull, and fine lines may be more noticeable. Dry skin lacks moisture and can feel uncomfortable, especially after cleansing.
- Combination Skin:
- Characteristics: Combination skin typically has an oily T-zone, with the cheeks and other areas feeling dry or normal. This is the most common skin type, and it can change depending on environmental factors, such as weather or diet.
- Care Tips: Use a balanced skincare routine that targets both dry and oily areas. Consider using different products for different areas, like a lightweight moisturizer for oily areas and a richer one for dry areas.
- Characteristics: Combination skin typically has an oily T-zone, with the cheeks and other areas feeling dry or normal. This is the most common skin type, and it can change depending on environmental factors, such as weather or diet.
- Sensitive Skin:
- Characteristics: Sensitive skin is prone to redness, irritation, or inflammation. It may react negatively to certain skincare products, including fragrances or alcohol. You may also notice stinging or burning sensations when using certain ingredients.
- Care Tips: Look for gentle, fragrance-free, and hypoallergenic products. Opt for soothing ingredients like chamomile, aloe vera, and calendula to calm irritation.
Step 1.5: Track and Adjust Over Time
Skin is not static—it can change due to various factors such as weather, hormones, diet, and stress. Therefore, it’s important to monitor your skin regularly and adjust your skincare routine accordingly.
Instructions:
- Monitor Seasonal Changes: Your skin may behave differently in different seasons. For instance, cold weather can cause dryness, while hot, humid conditions can lead to oily skin. Make note of these changes and adjust your routine.
- Pay Attention to External Factors: Stress, diet, and lifestyle changes can affect your skin’s behavior. Stress, for example, may trigger breakouts, while a healthy diet can improve skin clarity.
- Observe Over Time: Skin type may fluctuate, especially during certain periods like puberty, pregnancy, or menopause. Keep a skincare journal to track these changes and note how your skin reacts to different products.
Conclusion:
Knowing your skin type is the first crucial step in your skincare journey. By following this simple yet detailed process, you can ensure that the products you use are aligned with your skin’s needs. Understanding your skin will allow you to make informed decisions and achieve a more balanced, radiant complexion. Regularly assess your skin and be mindful of changes, as this knowledge will empower you to maintain healthy, glowing skin in the long term.
Step 2: Understanding the Importance of Skin Type
Introduction: Once you have identified your skin type, the next critical step in your skincare journey is to understand why it’s essential to know this information. Your skin type determines what your skin needs, how it reacts to certain ingredients, and the types of natural products that will be most effective for you. Choosing the right products based on your skin type can have a profound impact on the health, appearance, and condition of your skin.
In this step, you will learn the importance of understanding your skin type and why it is a vital foundation for building a skincare routine with natural products that are suited to your skin’s needs. This knowledge will help you make informed decisions and avoid products that may be ineffective or, worse, cause irritation or imbalances in your skin.
Step 2.1: Skin Type as the Foundation for Your Skincare Routine
The key reason understanding your skin type is crucial is that it directly influences the products and ingredients that will work best for your skin. Different skin types have different needs, and the same product may not work the same way across all skin types.
Instructions:
- Matching Products to Skin Needs: When you choose skincare products, especially natural products, knowing your skin type ensures that you select ingredients that complement your skin’s characteristics. For instance:
- Oily skin benefits from ingredients that control sebum production, like tea tree oil or witch hazel.
- Dry skin needs products with deeply hydrating and moisturizing ingredients such as aloe vera, honey, or coconut oil.
- Sensitive skin requires gentle, soothing ingredients like chamomile, calendula, or oat extract.
- Combination skin needs balancing products that address both the dry and oily areas separately.
- Maximizing Effectiveness: Using products that match your skin type enhances their effectiveness. When you choose the right product for your skin type, you’ll see better results. For example, using a moisturizer that’s too heavy for oily skin can lead to clogged pores and breakouts, while using a lightweight product for dry skin may leave it feeling parched or irritated.
- Preventing Damage: Applying products that are not suited to your skin type can lead to long-term damage. For example, harsh products for sensitive skin can cause inflammation and irritation, while an overly oily product on acne-prone skin may worsen breakouts. Understanding your skin type helps you prevent such issues.
Step 2.2: Natural Skincare Ingredients for Specific Skin Types
Once you understand your skin type, you’ll be in a better position to select natural ingredients that will suit your skin’s needs. Natural products tend to have a more balanced, gentler effect on the skin, which is why they’re becoming increasingly popular. However, not all natural ingredients are suitable for every skin type. This section highlights the importance of choosing the right natural ingredients based on your skin type.
Instructions:
- Oily Skin:
- Why It Matters: Oily skin produces excess sebum, which can clog pores and lead to acne breakouts. Using the wrong products can worsen this condition.
- Key Natural Ingredients: Opt for ingredients that balance oil production and have antibacterial properties. Some examples include:
- Tea Tree Oil: Known for its antibacterial and anti-inflammatory properties, tea tree oil helps to control excess oil while preventing breakouts.
- Witch Hazel: A natural astringent that tightens pores and controls oil production.
- Lemon or Orange Peel Extract: These can help absorb excess oil while providing a refreshing, natural fragrance.
- Clay Masks (like Bentonite Clay): Excellent for absorbing excess oil and unclogging pores.
- Tea Tree Oil: Known for its antibacterial and anti-inflammatory properties, tea tree oil helps to control excess oil while preventing breakouts.
- Why It Matters: Oily skin produces excess sebum, which can clog pores and lead to acne breakouts. Using the wrong products can worsen this condition.
- Dry Skin:
- Why It Matters: Dry skin lacks moisture and can often feel tight, flaky, or rough. Natural products with hydrating properties are essential to replenish lost moisture and provide nourishment.
- Key Natural Ingredients: Look for deeply hydrating ingredients that form a moisture barrier to protect your skin. These include:
- Aloe Vera: Hydrating and soothing, aloe vera helps lock in moisture without feeling heavy.
- Coconut Oil: Rich in fatty acids, coconut oil is deeply moisturizing, making it ideal for dry skin.
- Shea Butter: A fantastic natural emollient that softens and nourishes dry skin, helping it retain moisture.
- Honey: A natural humectant that draws moisture to the skin and helps it stay hydrated.
- Aloe Vera: Hydrating and soothing, aloe vera helps lock in moisture without feeling heavy.
- Why It Matters: Dry skin lacks moisture and can often feel tight, flaky, or rough. Natural products with hydrating properties are essential to replenish lost moisture and provide nourishment.
- Combination Skin:
- Why It Matters: Combination skin has both oily and dry areas, often resulting in a more complicated skincare routine. Using products that suit both the oily and dry areas is key to maintaining balance.
- Key Natural Ingredients: Choose products that balance oil control while nourishing dry patches. Suitable ingredients include:
- Jojoba Oil: Mimics the skin’s natural sebum, making it effective for both moisturizing dry patches and regulating excess oil production in the T-zone.
- Grapeseed Oil: Lightweight and non-greasy, it hydrates dry areas without causing excess oil in the T-zone.
- Rose Water: A gentle, natural toner that hydrates and refreshes, while balancing oil production.
- Lavender Oil: Known for its calming effects, lavender can be beneficial for balancing both dry and oily skin.
- Jojoba Oil: Mimics the skin’s natural sebum, making it effective for both moisturizing dry patches and regulating excess oil production in the T-zone.
- Why It Matters: Combination skin has both oily and dry areas, often resulting in a more complicated skincare routine. Using products that suit both the oily and dry areas is key to maintaining balance.
- Sensitive Skin:
- Why It Matters: Sensitive skin is prone to irritation, redness, and allergic reactions. Using harsh or unsuitable products can cause inflammation and worsen the skin’s condition.
- Key Natural Ingredients: Choose soothing, non-irritating ingredients that help calm inflammation and reduce redness. Some ideal options are:
- Chamomile Extract: Known for its soothing properties, chamomile helps calm inflamed or irritated skin.
- Oat Extract: Oats are incredibly gentle and help to soothe itching, dryness, and redness.
- Calendula Oil: A natural anti-inflammatory oil that helps reduce skin irritation and promote healing.
- Cucumber Extract: Known for its cooling properties, cucumber can hydrate and calm sensitive skin.
- Chamomile Extract: Known for its soothing properties, chamomile helps calm inflamed or irritated skin.
- Why It Matters: Sensitive skin is prone to irritation, redness, and allergic reactions. Using harsh or unsuitable products can cause inflammation and worsen the skin’s condition.
Step 2.3: Why Skincare Tailored to Your Skin Type Leads to Better Results
When you use products suited to your skin type, your skin is more likely to respond positively. Applying the right skincare routine reduces the risk of breakouts, dryness, irritation, or other issues. It also helps you maintain your skin’s health and prevent long-term damage. Conversely, using products that don’t align with your skin type can lead to ineffective results or even cause worsening conditions like acne, redness, or premature aging.
Instructions:
- Effectiveness of Active Ingredients: By choosing products based on your skin type, the active ingredients are more likely to work effectively. For instance, a hydrating serum with hyaluronic acid works best for dry skin, while salicylic acid is more effective for acne-prone oily skin.
- Consistency is Key: Skincare products designed for your skin type will support long-term improvements. For example, using oil-free products on oily skin consistently will help control excess sebum production over time, while hydrating products for dry skin will help restore moisture balance.
- Maintaining Skin Health: Knowing your skin type allows you to protect it from external stressors, such as pollution, extreme weather conditions, or UV rays. Using the right products tailored to your skin helps maintain its natural barrier, keeping it strong and resilient.
- Prevention is Better Than Cure: By using products suited to your skin type, you are preventing potential issues, such as clogged pores, premature aging, or excessive dryness. This proactive approach is key to maintaining healthy, youthful skin for the long term.
Step 2.4: The Risk of Using Products Not Suited to Your Skin Type
Using the wrong products can lead to a host of skin issues. These issues can not only make your skin feel uncomfortable but can also compromise its health over time.
Instructions:
- For Oily Skin: Using overly moisturizing products or products not designed for oily skin can cause excess shine, clogged pores, and acne. Your skin may become greasy and prone to breakouts if it cannot breathe properly.
- For Dry Skin: Harsh, alcohol-based products can strip moisture from the skin, leaving it feeling tight and irritated. Over time, this can lead to premature aging and fine lines, as well as an overall dull complexion.
- For Sensitive Skin: Strong fragrances, alcohol, or certain preservatives can trigger allergic reactions, irritation, and redness in sensitive skin. This may cause discomfort and inflammation, which can be challenging to reverse.
- For Combination Skin: If you don’t address both dry and oily areas properly, you may end up exacerbating one of the skin conditions (dryness or oiliness) while ignoring the other. This imbalance can cause further breakouts or dehydration.
Conclusion:
Understanding your skin type is not just a step—it’s the core principle that guides your entire skincare journey. When you use natural products that align with your skin’s specific needs, you’ll experience better results, healthier skin, and fewer issues over time. Knowing your skin type empowers you to make educated decisions about which ingredients and products will benefit you the most, leading to radiant, balanced skin.
Step 3: Test Your Skin
Introduction: Now that you have identified your skin type and understand its importance in determining your skincare routine, it’s time to take a more hands-on approach. Testing your skin is crucial to further understanding its behavior in different conditions and environments. By conducting simple skin tests, you can gain valuable insights into how your skin reacts to various factors such as climate changes, stress, diet, and product usage.
In this step, you will learn how to test your skin effectively using techniques like blotting paper or observing how your skin responds to different conditions. This process will help you become more in tune with your skin’s behaviors, allowing you to adjust your skincare routine accordingly and choose products that best suit your needs.
Step 3.1: Use Blotting Papers to Test Oil Production
Blotting papers are a quick and easy tool for assessing your skin’s oil production throughout the day. These simple sheets of paper help determine whether your skin is producing excess oil or if it’s more on the dry side. This test will help you better understand how your skin behaves in real-time, allowing you to select products that manage oil levels effectively.
Instructions:
- Step 1: Wash Your Face
- Begin by thoroughly cleansing your face to remove any makeup, dirt, or oil that may have built up. This ensures that your test is based on fresh, clean skin.
- Begin by thoroughly cleansing your face to remove any makeup, dirt, or oil that may have built up. This ensures that your test is based on fresh, clean skin.
- Step 2: Wait for a Few Hours
- After washing, wait for 2-3 hours before using blotting papers. This will allow your skin to naturally react to the environment, such as humidity and air exposure.
- After washing, wait for 2-3 hours before using blotting papers. This will allow your skin to naturally react to the environment, such as humidity and air exposure.
- Step 3: Press Blotting Paper Against Your Skin
- Take a blotting paper and gently press it onto different areas of your face. Pay attention to how it feels in key zones, such as your forehead, nose, cheeks, and chin (commonly known as the T-zone).
- Take a blotting paper and gently press it onto different areas of your face. Pay attention to how it feels in key zones, such as your forehead, nose, cheeks, and chin (commonly known as the T-zone).
- Step 4: Assess the Oil Levels
- Hold the blotting paper up to the light to see how much oil has been absorbed. If the paper is noticeably oily, this indicates that your skin is producing excess oil, which is typical of oily skin. If there is little to no oil, your skin may be dry or normal.
Key Takeaway:
- Oily Skin: The blotting paper will appear very oily, especially in the T-zone area.
- Dry Skin: The blotting paper will remain dry or slightly moist.
- Combination Skin: There may be oil in some areas (like the T-zone) but not in others.
- Normal Skin: The blotting paper will show a slight trace of oil, mostly in the T-zone.
By using blotting paper regularly, you can track how your skin’s oil production changes throughout the day and in different environmental conditions.
Step 3.2: Observe How Your Skin Reacts to Changes in Climate
Your skin can respond differently depending on the climate you are in. The temperature, humidity, and air quality all play significant roles in how your skin behaves. Whether you’re in a hot and humid environment or a cold and dry one, understanding how your skin reacts to these conditions can help you adjust your skincare routine for better results.
Instructions:
- Step 1: Identify the Climate
- Take note of the current climate in your area. Is it hot, humid, cold, dry, or a mix? Your skin’s behavior will vary depending on these conditions.
- Take note of the current climate in your area. Is it hot, humid, cold, dry, or a mix? Your skin’s behavior will vary depending on these conditions.
- Step 2: Observe Skin Reactions
- Spend a day or two in the identified climate and closely observe how your skin feels throughout the day. Pay attention to whether your skin feels more dry, oily, or irritated, and note any changes.
- For example:
- In hot and humid weather, your skin may become oilier due to increased sweat and humidity.
- In cold and dry weather, you may notice dryness, flaking, or tightness.
- In hot and humid weather, your skin may become oilier due to increased sweat and humidity.
- Spend a day or two in the identified climate and closely observe how your skin feels throughout the day. Pay attention to whether your skin feels more dry, oily, or irritated, and note any changes.
- Step 3: Adjust Your Skincare Routine
- Based on how your skin reacts, you may need to adjust your skincare routine. For example:
- In humid weather, you may need lighter, oil-free moisturizers or mattifying products.
- In cold weather, richer, more hydrating creams may be necessary to prevent dryness and flakiness.
- Based on how your skin reacts, you may need to adjust your skincare routine. For example:
- Step 4: Repeat in Different Climates
- Try observing your skin in different weather conditions to get a broader understanding of its behavior. This knowledge will help you tailor your skincare routine based on the climate you’re in.
Step 3.3: Assess How Your Skin Responds to Stress
Stress can significantly impact your skin’s appearance and condition. During periods of high stress, you may notice changes such as breakouts, dryness, or redness. By understanding how stress affects your skin, you can adjust your skincare and lifestyle habits to minimize these effects.
Instructions:
- Step 1: Track Stress Levels
- During times of heightened stress, whether due to work, personal life, or other factors, keep track of your skin’s condition. Are you noticing new blemishes, redness, or dryness?
- During times of heightened stress, whether due to work, personal life, or other factors, keep track of your skin’s condition. Are you noticing new blemishes, redness, or dryness?
- Step 2: Observe Skin Behavior
- Take note of how your skin behaves during stressful periods. Does it become more oily, or does it appear drier and more irritated? Is there an increase in acne or redness around your T-zone or chin? These are common signs of stress affecting your skin.
- Take note of how your skin behaves during stressful periods. Does it become more oily, or does it appear drier and more irritated? Is there an increase in acne or redness around your T-zone or chin? These are common signs of stress affecting your skin.
- Step 3: Identify Skin Changes
- For example:
- Increased Oil Production: Stress can cause an increase in oil production, leading to oily skin or breakouts.
- Breakouts: Stress can lead to hormonal changes that trigger acne.
- Redness or Dryness: Stress may lead to heightened skin sensitivity, causing flare-ups of eczema or rosacea, or simply making your skin feel tight and dehydrated.
- Increased Oil Production: Stress can cause an increase in oil production, leading to oily skin or breakouts.
- For example:
- Step 4: Implement Stress-Reduction Measures
- To mitigate the effects of stress on your skin, practice stress management techniques such as meditation, deep breathing, yoga, or exercise. Additionally, incorporate calming skincare products, such as those with lavender or chamomile, into your routine.
Step 3.4: Observe How Diet Affects Your Skin
What you eat has a direct impact on your skin’s health. Your diet can influence factors such as inflammation, oil production, and the appearance of blemishes. By understanding the relationship between your diet and your skin’s condition, you can make dietary changes to promote healthy skin.
Instructions:
- Step 1: Track Your Diet
- For a few days, keep track of what you eat, including meals and snacks. Note any potential links between certain foods and changes in your skin.
- For a few days, keep track of what you eat, including meals and snacks. Note any potential links between certain foods and changes in your skin.
- Step 2: Observe Skin Responses
- After consuming certain foods, observe your skin closely for any reactions. For example:
- High Sugar Diet: Excessive sugar intake can lead to inflammation, increased oil production, and acne breakouts.
- Dairy Products: Some people may find that dairy triggers acne or irritation.
- Hydration: Insufficient water intake can lead to dry, dull skin.
- High Sugar Diet: Excessive sugar intake can lead to inflammation, increased oil production, and acne breakouts.
- After consuming certain foods, observe your skin closely for any reactions. For example:
- Step 3: Make Dietary Adjustments
- Based on your observations, make adjustments to your diet. For example, if you notice an increase in breakouts after consuming dairy, consider reducing your intake or eliminating it for a while to see if your skin improves.
- Based on your observations, make adjustments to your diet. For example, if you notice an increase in breakouts after consuming dairy, consider reducing your intake or eliminating it for a while to see if your skin improves.
- Step 4: Include Skin-Friendly Foods
- Incorporate skin-friendly foods into your diet, such as:
- Omega-3 fatty acids from fish, flaxseeds, or walnuts to promote healthy, hydrated skin.
- Antioxidants from fruits and vegetables (such as berries, spinach, and kale) to fight free radicals and reduce inflammation.
- Water to keep your skin hydrated and flush out toxins.
- Omega-3 fatty acids from fish, flaxseeds, or walnuts to promote healthy, hydrated skin.
- Incorporate skin-friendly foods into your diet, such as:
Conclusion:
Testing your skin in different conditions is an essential step in understanding how your skin behaves under various circumstances. By using blotting papers, observing how your skin reacts to changes in climate, stress, and diet, you can gain deeper insights into its unique needs. With this knowledge, you can better personalize your skincare routine and choose the most effective natural products for your skin type. Remember, this process is ongoing—your skin may react differently based on seasonality, lifestyle changes, or aging, so regularly assessing your skin will help you stay in tune with its needs for optimal care.
Step 4: Adjust Your Routine
Introduction: Now that you have gained a deep understanding of your skin type through the previous steps, it’s time to fine-tune your skincare routine to cater to your skin’s specific needs. Properly adjusting your routine based on your skin type is crucial for achieving healthy, glowing skin and preventing common issues such as breakouts, dryness, or irritation.
Each skin type requires a different approach, and by using products that align with your skin’s natural characteristics, you can help it thrive. In this step, we will explore how to adjust your skincare routine based on whether you have oily, dry, combination, or sensitive skin, and which products are best suited for each.
Step 4.1: Adjusting Your Routine for Oily Skin
Oily skin tends to produce excess sebum (oil), especially in areas such as the forehead, nose, and chin (the T-zone). If left unaddressed, this can lead to clogged pores, breakouts, and an overall shiny complexion. Therefore, your skincare routine should focus on controlling oil production while maintaining hydration and preventing skin imbalances.
Instructions:
- Step 1: Use a Gel-Based Cleanser
- Choose a gentle, oil-free, gel-based cleanser that removes excess oil without stripping your skin of its natural moisture. Avoid harsh soaps or cleansers that may trigger more oil production as your skin compensates for the dryness.
- Choose a gentle, oil-free, gel-based cleanser that removes excess oil without stripping your skin of its natural moisture. Avoid harsh soaps or cleansers that may trigger more oil production as your skin compensates for the dryness.
- Step 2: Opt for Lightweight Moisturizers
- Even oily skin needs moisture. Use a lightweight, oil-free moisturizer or gel moisturizer. These formulations hydrate the skin without contributing to the greasy feeling.
- Even oily skin needs moisture. Use a lightweight, oil-free moisturizer or gel moisturizer. These formulations hydrate the skin without contributing to the greasy feeling.
- Step 3: Incorporate Mattifying Products
- Consider using mattifying toners or serums to reduce shine and control oil. Look for ingredients like salicylic acid or niacinamide, which help control sebum production and reduce the appearance of pores.
- Consider using mattifying toners or serums to reduce shine and control oil. Look for ingredients like salicylic acid or niacinamide, which help control sebum production and reduce the appearance of pores.
- Step 4: Use Oil-Free Sunscreen
- Sunscreen is essential, even for oily skin. Choose an oil-free, non-comedogenic sunscreen to protect your skin from harmful UV rays without clogging pores.
Key Takeaway:
- Focus on controlling oil with gentle products that do not over-dry the skin, as this could lead to further oil production.
Step 4.2: Adjusting Your Routine for Dry Skin
Dry skin occurs when your skin lacks moisture and essential oils. It can result in tightness, flaking, redness, and increased sensitivity. To address dry skin, your routine should emphasize deep hydration, nourishment, and barrier repair. The goal is to restore moisture and lock it in.
Instructions:
- Step 1: Use a Cream-Based, Hydrating Cleanser
- Choose a creamy, hydrating cleanser that is gentle and does not strip away natural oils. Avoid foaming or harsh cleansers, as they can exacerbate dryness. Look for ingredients like hyaluronic acid or glycerin, which attract moisture to the skin.
- Choose a creamy, hydrating cleanser that is gentle and does not strip away natural oils. Avoid foaming or harsh cleansers, as they can exacerbate dryness. Look for ingredients like hyaluronic acid or glycerin, which attract moisture to the skin.
- Step 2: Apply a Rich Moisturizer
- After cleansing, apply a rich, emollient moisturizer that helps to seal in moisture. Look for ingredients like ceramides, shea butter, or jojoba oil, which are known for their skin-nourishing properties.
- After cleansing, apply a rich, emollient moisturizer that helps to seal in moisture. Look for ingredients like ceramides, shea butter, or jojoba oil, which are known for their skin-nourishing properties.
- Step 3: Use Oils for Extra Hydration
- Consider incorporating facial oils into your routine, especially if your skin feels exceptionally dry. Oils like argan oil, rosehip oil, and olive oil can help deeply hydrate and restore the skin’s natural moisture balance.
- Consider incorporating facial oils into your routine, especially if your skin feels exceptionally dry. Oils like argan oil, rosehip oil, and olive oil can help deeply hydrate and restore the skin’s natural moisture balance.
- Step 4: Choose Hydrating Sunscreen
- Choose a moisturizing sunscreen that not only protects your skin from UV rays but also provides an additional layer of hydration. Look for sunscreens with added moisturizing ingredients like glycerin or squalane.
Key Takeaway:
- Prioritize hydration with rich, nourishing products that restore moisture and protect the skin’s moisture barrier.
Step 4.3: Adjusting Your Routine for Combination Skin
Combination skin is a blend of both oily and dry areas. The T-zone (forehead, nose, chin) tends to be oilier, while the cheeks may be drier. This skin type requires a balanced approach, targeting oil control in specific areas while providing extra hydration to the dry areas.
Instructions:
- Step 1: Use a Balanced Cleanser
- Choose a gentle, non-stripping cleanser that can cleanse both the oily and dry areas of your face without causing imbalances. A foaming or cream cleanser with mild ingredients such as aloe vera or chamomile works well for this skin type.
- Choose a gentle, non-stripping cleanser that can cleanse both the oily and dry areas of your face without causing imbalances. A foaming or cream cleanser with mild ingredients such as aloe vera or chamomile works well for this skin type.
- Step 2: Apply a Toning Lotion
- Use a balancing toner that helps control oil while hydrating dry areas. Look for toners with ingredients like witch hazel for oil control or hyaluronic acid for added moisture. Apply it gently to the T-zone, and if necessary, on dry areas for a uniform result.
- Use a balancing toner that helps control oil while hydrating dry areas. Look for toners with ingredients like witch hazel for oil control or hyaluronic acid for added moisture. Apply it gently to the T-zone, and if necessary, on dry areas for a uniform result.
- Step 3: Use a Lightweight Moisturizer
- Apply a lightweight moisturizer to the oily areas, but use a richer moisturizer on the drier parts of your face. Alternatively, you can use a gel-based moisturizer for the whole face if your skin requires less intensive moisture.
- Apply a lightweight moisturizer to the oily areas, but use a richer moisturizer on the drier parts of your face. Alternatively, you can use a gel-based moisturizer for the whole face if your skin requires less intensive moisture.
- Step 4: Apply Sunscreen Based on Your Needs
- Depending on your skin’s needs, use an oil-free sunscreen for your T-zone and a more hydrating sunscreen for the drier areas of your face.
Key Takeaway:
- Focus on balancing oil and moisture with tailored products for each zone of your face.
Step 4.4: Adjusting Your Routine for Sensitive Skin
Sensitive skin is prone to irritation, redness, and reactions to various products or environmental changes. It requires a gentle, calming approach with soothing ingredients that minimize inflammation and reduce sensitivity.
Instructions:
- Step 1: Choose a Soothing, Gentle Cleanser
- Use a fragrance-free, hypoallergenic, and non-foaming cleanser to avoid irritating sensitive skin. Look for products containing calming ingredients like aloe vera, oatmeal, or cucumber.
- Use a fragrance-free, hypoallergenic, and non-foaming cleanser to avoid irritating sensitive skin. Look for products containing calming ingredients like aloe vera, oatmeal, or cucumber.
- Step 2: Avoid Harsh Exfoliants
- Avoid physical exfoliants or harsh chemical exfoliants that could irritate sensitive skin. Instead, opt for a gentle exfoliating toner with lactic acid or mild enzyme exfoliants that are less likely to cause irritation.
- Avoid physical exfoliants or harsh chemical exfoliants that could irritate sensitive skin. Instead, opt for a gentle exfoliating toner with lactic acid or mild enzyme exfoliants that are less likely to cause irritation.
- Step 3: Use Calming Moisturizers
- Choose a calming moisturizer with ingredients like ceramides, glycerin, chamomile, or niacinamide. These ingredients help reduce redness, soothe irritation, and reinforce the skin’s barrier.
- Choose a calming moisturizer with ingredients like ceramides, glycerin, chamomile, or niacinamide. These ingredients help reduce redness, soothe irritation, and reinforce the skin’s barrier.
- Step 4: Apply Sunscreen with Added Skin Protection
- For sensitive skin, use a mineral sunscreen containing zinc oxide or titanium dioxide to avoid irritation from chemical sunscreens. These provide broad-spectrum protection and are less likely to cause reactions.
Key Takeaway:
- Focus on using fragrance-free, calming, and barrier-repairing products to protect sensitive skin from irritation.
Conclusion:
Adjusting your skincare routine according to your skin type is a key step in achieving optimal skin health. Each skin type has specific needs, and by using the right products, you can address those needs effectively. Whether your skin is oily, dry, combination, or sensitive, understanding the specific requirements of your skin will allow you to craft a routine that works for you, helping you achieve a glowing, healthy complexion.
Remember, skincare is a journey, and your skin may change over time due to various factors like age, climate, or diet. Therefore, it’s important to regularly assess your skin and adjust your routine as needed. By taking this tailored approach, you will create a skincare regimen that not only suits your current skin type but also adapts to any changes in the future.
We’re also giving these extra bonuses
Natural Skin Care – Checklist
Natural Skin Care – FAQs

Natural Skin Care – Salespage Content
Package Details:
Word Count: 27 096 Words
Number of Pages: 102
Natural Skin Care – Bonus Content
Checklist
Word Count: 520 words
FAQs
Word Count: 1237 words
Salespage Content
Word Count: 763 words
Total Word Count: 29 616 Words
Your PLR License Terms
PERMISSIONS: What Can You Do With These Materials?
Sell the content basically as it is (with some minor tweaks to make it “yours”).
If you are going to claim copyright to anything created with this content, then you must substantially change at 75% of the content to distinguish yourself from other licensees.
Break up the content into small portions to sell as individual reports for $10-$20 each.
Bundle the content with other existing content to create larger products for $47-$97 each.
Setup your own membership site with the content and generate monthly residual payments!
Take the content and convert it into a multiple-week “eclass” that you charge $297-$497 to access!
Use the content to create a “physical” product that you sell for premium prices!
Convert it to audios, videos, membership site content and more.
Excerpt and / or edit portions of the content to give away for free as blog posts, reports, etc. to use as lead magnets, incentives and more!
Create your own original product from it, set it up at a site and “flip” the site for megabucks!
RESTRICTIONS: What Can’t You Do With These Materials?
To protect the value of these products, you may not pass on the rights to your customers. This means that your customers may not have PLR rights or reprint / resell rights passed on to them.
You may not pass on any kind of licensing (PLR, reprint / resell, etc.) to ANY offer created from ANY PORTION OF this content that would allow additional people to sell or give away any portion of the content contained in this package.
You may not offer 100% commission to affiliates selling your version / copy of this product. The maximum affiliate commission you may pay out for offers created that include parts of this content is 75%.
You are not permitted to give the complete materials away in their current state for free – they must be sold. They must be excerpted and / or edited to be given away, unless otherwise noted. Example: You ARE permitted to excerpt portions of content for blog posts, lead magnets, etc.
You may not add this content to any part of an existing customer order that would not require them to make an additional purchase. (IE You cannot add it to a package, membership site, etc. that customers have ALREADY paid for.)
Share Now!
Latest Products


Free Sales Funnel Builder

Related Products
Popular & Trending


Featured Products