Gardening Guide For Beginners PLR Course 21k Words
in Gardening PLR , Gardening PLR Ebooks , PLR eBooks , PLR eCourses , PLR List Building Reports , Premium PLR , Premium PLR eBooks , Premium PLR Reports , Premium White Label Brandable PLR Coaching Courses , Private Label Rights ProductsChoose Your Desired Option(s)
has been added to your cart!
have been added to your cart!
#gardeningplr #beginnergardening #gardeningtips #homegardening #plrcourse #gardeningcontent #diygardening #backyardgardening #gardeningforbeginners
Gardening Guide for Beginners PLR Course – Your Step-by-Step Guide to Growing a Thriving Garden
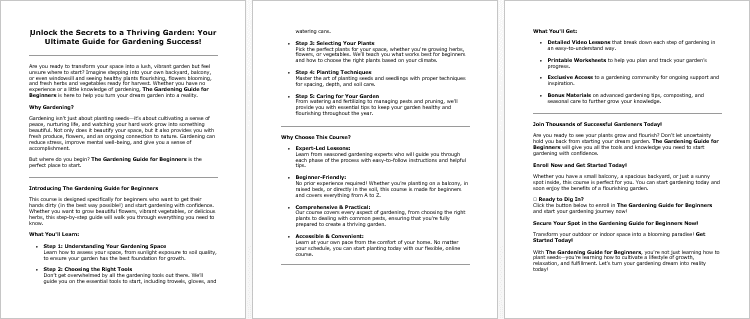
Welcome to the Gardening Guide for Beginners course – the ultimate resource for anyone looking to cultivate their green thumb, whether you’re a seasoned gardener or just starting out. Whether you have a large backyard or a small balcony, this course provides the essential steps to help you grow and maintain a healthy, beautiful garden. Packed with practical tips and easy-to-follow guidance, you’ll be well on your way to mastering the art of gardening!
Presenting…
Gardening Guide For Beginners PLR Course 21k Words
Course Overview
Gardening is more than just planting seeds and watching them grow. It’s about understanding your environment, choosing the right plants, nurturing your soil, and developing a routine that helps your garden flourish year-round. The Gardening Guide for Beginners is a detailed, practical course designed to walk you through every step of the gardening process—from choosing the right plants to maintaining your garden for years to come.
In 19,222 words, this course covers everything from setting up your garden space to handling common gardening challenges. Whether you’re growing flowers, vegetables, or herbs, this course will help you create the garden of your dreams—no matter your experience level.
Course Modules
Module 1: Preparing for Your Gardening Journey
The foundation of any successful garden is understanding your space, tools, and the plants you’ll grow. This module sets the stage for your gardening journey with essential tips for beginners.
- Step 1: Understanding Your Gardening Space
Learn how to evaluate your gardening space. Whether you have a balcony, backyard, or windowsill, assess sunlight, wind, and soil conditions to determine the best areas for planting. - Step 2: Choosing the Right Tools
Find out which essential gardening tools you’ll need, from gloves to trowels. We’ll keep it simple and practical, so you don’t feel overwhelmed. - Step 3: Selecting Your Plants
Learn how to choose plants that fit your space and climate. We cover beginner-friendly plants like herbs, flowers, and veggies that are easy to grow and maintain. - Step 4: Creating a Gardening Plan
Plan your garden layout! Decide where each plant will go, how much space they need, and when to plant them for the best results.
Module 2: Setting Up Your Garden
Once you’ve prepared, it’s time to bring your garden to life. This module will guide you through setting up your garden, including soil preparation and planting techniques.
- Step 1: Preparing the Soil
Learn how to test your soil and enrich it using compost or other organic materials. Healthy soil is essential for healthy plants! - Step 2: Setting Up Containers or Garden Beds
Decide whether you want to plant in pots, raised beds, or directly in the soil. Get step-by-step instructions for setting up each method. - Step 3: Watering 101
Understand how to water your plants properly, avoiding common mistakes like overwatering or underwatering. Learn to read the signs your plants give when they need water. - Step 4: Adding Fertilizers and Mulch
Use fertilizers to boost plant growth and mulch to retain moisture and reduce weeds. Learn the best practices for each.
Module 3: Planting Your Garden
Now that you’ve set everything up, it’s time to get planting! This module will help you plant seeds, seedlings, and everything in between.
- Step 1: Planting Seeds and Seedlings
Learn the proper techniques for planting seeds and transferring seedlings to your garden. This ensures the best start for your plants. - Step 2: Spacing and Depth
Get advice on how to space plants properly and how deep to plant each seed or seedling to encourage optimal growth. - Step 3: Companion Planting Tips
Learn which plants grow well together and how companion planting can help protect your plants from pests and improve their growth. - Step 4: Labeling and Tracking Growth
Organize your garden by labeling your plants and keeping track of their growth. Use a gardening journal to record important milestones and changes.
Module 4: Caring for Your Growing Plants
Your plants need ongoing care, and this module will show you how to keep them healthy and thriving through the different stages of growth.
- Step 1: Pruning and Trimming
Learn when and how to prune plants to keep them healthy, remove dead branches, and encourage new growth. - Step 2: Dealing with Pests and Diseases
Understand common pests and diseases that affect gardens. Learn natural ways to treat and prevent them, so you can protect your plants without harmful chemicals. - Step 3: Regular Watering and Feeding
Establish a regular watering and feeding schedule to ensure your plants get the nutrients they need for optimal growth. - Step 4: Supporting Climbing Plants
Use stakes, trellises, and other supports to help climbing plants grow strong and healthy.
Module 5: Harvesting and Maintaining Your Garden
Once your plants have matured, it’s time to enjoy the fruits of your labor! This module will guide you on how to harvest your crops, maintain your garden, and prepare for future seasons.
- Step 1: Knowing When to Harvest
Learn how to tell when your fruits, vegetables, or flowers are ready to be picked. Timing your harvest is crucial for getting the best flavor and quality. - Step 2: Storing Your Harvest
Discover how to store or preserve your produce, so it stays fresh longer and you don’t waste any of your hard-earned crops. - Step 3: Seasonal Garden Care
Prepare your garden for different seasons. Get tips on what to plant next, and how to protect your plants during winter months. - Step 4: Expanding Your Garden Knowledge
Once you’ve mastered the basics, learn more advanced gardening techniques like composting, crop rotation, and creating a wildlife-friendly garden.
Bonus Materials Included
Along with the main course content, you’ll receive these valuable bonus materials to further enhance your gardening skills and make your learning experience even more comprehensive.
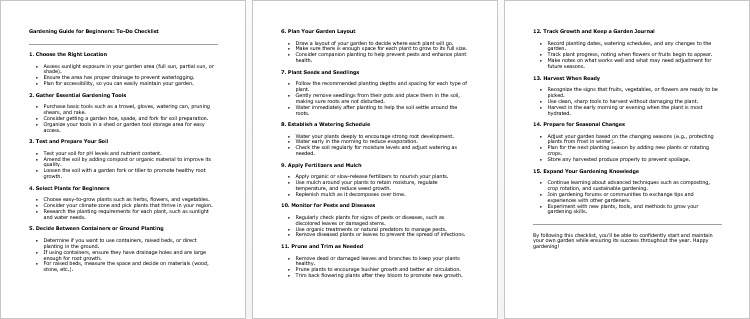
- Gardening Guide for Beginners – Checklist – 651 words
- Gardening Guide for Beginners – FAQs – 1,027 words
- Gardening Guide for Beginners – Salespage – 707 words
How to Use and Profit from This Course
The Gardening Guide for Beginners PLR Course isn’t just valuable for personal use—it’s also a great business opportunity. Here are some ways to profit from this course:
- Sell the Course As-Is: Simply rebrand and sell this course as your own, keeping the content mostly unchanged.
- Break It Into Smaller Reports: Divide the course into individual reports and sell them for $10-$20 each.
- Create a Bundle: Bundle this course with other gardening-related content and sell it as a package for $47-$97.
- Build an Online Course: Use this content to create a multiple-week eCourse that you can sell for $297-$497.
- Membership Site: Create a gardening membership site and charge monthly fees for access to the content and ongoing tips.
- Convert into a Physical Product: Print the course as a book or a guide and sell it for a premium price.
- Sell Audio/Video Versions: Convert the course into an audio or video format and sell it in alternative formats.
- Use as a Lead Magnet: Excerpt sections of the course and offer them for free as blog posts, reports, or lead magnets to build your email list.
License Terms
Here’s what you can and cannot do with the Gardening Guide for Beginners PLR Course:
What You Can Do:
- Sell the content as-is (with minor tweaks to make it your own).
- Break the content into smaller portions and sell them as individual reports.
- Bundle the content with other content to create larger products.
- Create and sell online courses, membership sites, or physical products.
- Convert it to audio, video, or any other format.
- Excerpt and edit portions for blog posts or as lead magnets.
What You Cannot Do:
- Pass on PLR or resell rights to your customers.
- Offer 100% affiliate commissions.
- Give away the complete materials for free in their current state.
- Add this content to existing customer orders without an additional purchase.
Get Started Today!
Are you ready to dig in and grow your garden? With the Gardening Guide for Beginners PLR Course, you’ll have everything you need to start your gardening journey and create a thriving space.
Buy Now and begin your gardening adventure today! 🌻
has been added to your cart!
have been added to your cart!
Here A Sample of Gardening Guide For Beginners PLR Course
Hi there, and welcome to the Gardening Guide for Beginners! 🌱 Whether you have a big backyard or just a small balcony, this course will help you grow your green thumb step by step. Let’s dig in!
Module 1: Preparing for Your Gardening Journey
Step 1: Understanding Your Gardening Space
Gardening success begins with understanding the space you have available. Whether it’s a sprawling backyard, a compact balcony, or a modest sunny windowsill, knowing your space’s strengths and limitations will help you create the perfect environment for your plants to thrive. Here’s a detailed guide to help you evaluate your gardening area step by step.
1. Identify Your Gardening Space
- Assess your options: Take a good look at your surroundings and decide where you’d like to start your garden. It could be an outdoor yard, an indoor corner, or even a rooftop.
- Measure the dimensions: Use a measuring tape to record the length and width of the space. Note these details in both metric (meters) and imperial (feet) systems, especially if you’re collaborating with international partners or sourcing materials from abroad.
- Consider accessibility: Is the area easy to reach for daily care and maintenance? A garden that’s too far or hard to access can make upkeep challenging.
2. Evaluate Sunlight Availability
- Observe the light pattern: Spend a day monitoring the area. Note how much direct sunlight it receives in the morning, afternoon, and evening. This is especially important for choosing plants suited to your conditions.
- Full sun: 6+ hours of direct sunlight per day.
- Partial sun/shade: 3–6 hours of sunlight.
- Full shade: Less than 3 hours of sunlight.
- Track the seasons: Keep in mind that sunlight patterns can change with the seasons. Summer might bring more light, while winter could cast long shadows. Adjust your gardening plan accordingly.
- Use a light meter: If possible, use a portable light meter to measure sunlight intensity in lux or foot-candles for precise data.
3. Assess Wind Exposure
- Monitor wind flow: Check if your gardening area is exposed to strong winds, which can damage plants, dry out soil, and make watering less effective.
- Identify wind barriers: Look for natural or man-made features like walls, fences, or hedges that may block or redirect wind. If none exist, consider adding windbreaks such as lattice screens or tall potted plants.
- Account for microclimates: Areas shielded by buildings or trees might have unique wind conditions compared to open spaces. Adapt your plant choices to these specific environments.
4. Examine Soil Conditions (for outdoor gardens)
- Test the soil type: Take a small handful of soil, add water, and roll it between your fingers.
- Sandy soil crumbles easily and drains water quickly.
- Clay soil feels sticky and holds water longer but may compact.
- Loamy soil is ideal for most plants, offering a balanced mix of drainage and nutrients.
- Check pH levels: Use a soil pH testing kit to determine acidity or alkalinity. Most plants thrive in neutral soil (pH 6–7). If needed, amend the soil with lime (to raise pH) or sulfur (to lower pH).
- Look for drainage issues: Observe how water behaves after rainfall or watering. Puddles indicate poor drainage, which might require raised beds or soil amendments.
5. Evaluate Indoor Spaces (for container gardening)
- Lighting: For indoor gardens, position plants near south-facing windows for maximum sunlight. Supplement with grow lights if natural light is insufficient.
- Space dimensions: Ensure the area can accommodate containers of varying sizes. Avoid overcrowding, which restricts air circulation and plant growth.
- Surface protection: Use waterproof trays or mats to protect floors and furniture from soil and water spills.
- Ventilation: Ensure proper airflow by keeping windows slightly open or using a fan to prevent mold and pests.
6. Note Additional Environmental Factors
- Humidity levels: Some plants, like ferns, prefer high humidity. If your area is dry, consider using a humidifier or grouping plants together to increase moisture.
- Temperature fluctuations: Check for hot or cold spots in your gardening area. Avoid placing plants near air conditioners, heaters, or drafty windows.
- Noise and activity: Consider if the area is subject to heavy foot traffic or noise that might disturb your plants or your own gardening enjoyment.
Next Steps
Now that you have a detailed understanding of your gardening space, document your findings. Create a layout map with notes about sunlight exposure, wind patterns, and soil conditions. This foundation will guide the next steps, from selecting the right plants to setting up your garden effectively.
Remember, every space has potential—whether small or large. Your goal is to optimize what you have to create a thriving, sustainable garden!
Step 2: Choosing the Right Tools
Having the right tools is crucial for any gardener, whether you’re working with a small balcony garden or a larger backyard plot. The key is to start with essentials that suit your space and gardening goals. In this section, we’ll explore the tools you need, how to choose them, and tips for maintaining them to ensure they last.
1. Understand the Basics of Gardening Tools
Before purchasing tools, it’s important to understand their uses and how they fit into your gardening tasks. Here’s a breakdown of essential tools and their purposes:
- Hand Trowel: Ideal for digging small holes, transplanting plants, and scooping soil or compost. Look for a sturdy stainless steel blade for durability.
- Pruning Shears (Secateurs): Used to trim small branches, deadhead flowers, and prune plants. Choose shears with an ergonomic handle to reduce hand strain.
- Garden Gloves: Protect your hands from dirt, thorns, and blisters. Look for gloves that are durable yet flexible enough for delicate tasks.
- Watering Can or Hose: Essential for keeping your plants hydrated. Select a can with a detachable spout or a hose with an adjustable nozzle for versatility.
- Garden Fork or Cultivator: Helps to loosen compacted soil, remove weeds, and aerate the ground.
- Spade or Shovel: A larger digging tool used for turning soil, planting shrubs, or moving compost. A spade has a flat blade, while a shovel has a curved one for scooping.
- Rake: Perfect for leveling soil, removing debris, or spreading mulch evenly.
- Wheelbarrow or Garden Cart: Necessary for transporting soil, compost, or plants in larger gardens.
2. Choose Tools Based on Your Gardening Needs
Your choice of tools should match the type of gardening you plan to do and the size of your space:
- Container Gardening (e.g., balcony or indoor):
- Hand tools like a trowel, small pruners, and gloves will suffice.
- Consider a compact watering can or spray bottle for indoor plants.
- Raised Beds or Small Outdoor Spaces:
- Add a garden fork, spade, and lightweight rake to your basic kit.
- A folding stool with tool pockets can be useful for accessibility.
- Larger Gardens or Backyards:
- Invest in heavier-duty tools such as a full-size spade, digging fork, and sturdy wheelbarrow.
- A garden hose with an adjustable nozzle or sprinkler system may be more efficient than a watering can.
3. Focus on Quality Over Quantity
It’s better to invest in a few high-quality tools that will last than to purchase a large set of cheaper ones that may break or wear out quickly. Here’s what to look for:
- Material: Opt for tools with stainless steel or carbon steel blades for durability and rust resistance. Wooden handles made from ash or hickory are strong and comfortable to grip.
- Ergonomics: Look for tools with padded or curved handles to reduce strain during use, especially if you have arthritis or will be gardening for extended periods.
- Weight and Size: Choose tools that are easy to lift and maneuver. Lightweight tools are best for smaller spaces, while heavier tools are more durable for bigger jobs.
4. Additional Tools for Specific Needs
Depending on your gardening goals, you might need specialized tools:
- Compost Bin: For creating organic compost from kitchen and garden waste.
- Seed Starting Tray: For germinating seeds before transplanting them into the garden.
- Soil Testing Kit: Helps you analyze the pH and nutrient levels in your soil.
- Plant Markers: Keep track of what you’ve planted and where, especially in larger gardens.
- Protective Gear: Consider kneepads for comfort while working on the ground, and hats or sunscreen for outdoor gardening.
5. Maintaining Your Tools
Proper maintenance ensures that your tools remain effective and safe to use:
- Cleaning: After each use, clean tools with water and a stiff brush to remove dirt. Dry thoroughly to prevent rust.
- Sharpening: Keep blades on pruners, shears, and spades sharp for easy and precise cutting. Use a sharpening stone or file.
- Oiling: Apply a thin layer of oil (e.g., linseed oil) to metal parts to protect against rust, and to wooden handles to prevent splitting.
- Storage: Store tools in a dry, covered area. Use hooks, racks, or a toolbox to keep them organized and off the ground.
6. Budget-Friendly Tips for Beginners
Starting out doesn’t have to break the bank. Here are some ideas for cost-saving:
- Look for starter kits that bundle essential tools.
- Check second-hand stores, online marketplaces, or community gardening groups for affordable options.
- Borrow tools for one-time tasks before committing to a purchase.
Next Steps
With your tools selected and ready, you’re now equipped to start setting up your garden. Remember, quality tools can make your gardening experience more enjoyable and efficient, so take the time to choose the right ones. Document your tool choices in your gardening journal to keep track of your progress and future needs.
By starting small and focusing on essentials, you’ll have everything you need to grow your green thumb and enjoy a flourishing garden.
Step 3: Selecting Your Plants
Choosing the right plants is one of the most exciting and important steps in starting your gardening journey. The plants you select should be based on your gardening space, climate, and personal preferences. In this section, we’ll explore how to choose plants wisely, focusing on easy-to-grow options ideal for beginners. By the end, you’ll have a clear plan for creating a garden tailored to your space and lifestyle.
1. Assess Your Space and Growing Conditions
Before selecting plants, you need to match them with your gardening environment:
- Light availability: Identify whether your space receives full sun (6+ hours), partial sun/shade (3–6 hours), or full shade (less than 3 hours). For example:
- Sun-loving plants like tomatoes, peppers, and marigolds thrive in full sunlight.
- Shade-tolerant options include ferns, lettuce, and hostas.
- Soil type: Test your soil’s drainage and pH. If your soil is too sandy, clay-heavy, or acidic, consider raised beds or containers with a balanced potting mix.
- Space constraints: For small areas like balconies or windowsills, opt for compact plants like herbs or dwarf varieties of vegetables. Large outdoor spaces can accommodate sprawling vines or shrubs.
2. Consider Your Climate and Growing Zone
Your local climate plays a significant role in determining what plants will thrive:
- Learn your growing zone: Use international plant hardiness maps (e.g., USDA Hardiness Zones) to identify your region’s average annual minimum temperature. Choose plants suited to your zone to avoid weather-related stress.
- Seasonal factors: Understand your region’s frost dates (first and last frost of the year). This helps you decide when to plant seeds or transplants.
- Adapt to local conditions: For warm climates, consider heat-tolerant plants like basil, okra, and zinnias. Cooler climates may favor spinach, kale, and pansies.
3. Start with Easy-to-Grow Plants
As a beginner, it’s best to choose plants that are forgiving and require minimal maintenance. Here are some great options:
- Herbs: Basil, parsley, mint, cilantro, and chives grow well in small spaces and are versatile in cooking. They thrive in pots or garden beds.
- Vegetables: Start with fast-growing, beginner-friendly veggies like radishes, lettuce, spinach, and cherry tomatoes. These provide quick results and are rewarding to harvest.
- Flowers: Marigolds, petunias, sunflowers, and zinnias are colorful, hardy flowers that add beauty to your garden and attract pollinators like bees and butterflies.
- Houseplants (if gardening indoors): Consider low-maintenance options like pothos, snake plants, and peace lilies, which thrive in indirect light and require minimal care.
4. Plan Your Garden Layout
With your plants in mind, design a layout that maximizes their growth potential:
- Group by sunlight needs: Place sun-loving plants in the brightest spots and shade-tolerant ones in less exposed areas.
- Companion planting: Research plants that grow well together, such as tomatoes and basil, which support each other’s growth and deter pests. Avoid combinations like onions and beans, which can inhibit each other.
- Spacing: Follow seed packet or plant label instructions for spacing to prevent overcrowding and ensure proper airflow. Overcrowding can lead to disease and stunted growth.
- Vertical gardening: Use trellises, stakes, or hanging baskets to make the most of limited space. Plants like cucumbers, beans, and strawberries are ideal for vertical setups.
5. Decide Between Seeds or Transplants
Choose the right method based on your experience level and growing season:
- Seeds: Ideal for plants like radishes, beans, and sunflowers. Seeds are cost-effective but require patience and careful nurturing during germination.
- Transplants: Starter plants from a nursery are great for beginners. They save time and are less prone to early-stage challenges. Vegetables like tomatoes and peppers are commonly sold as transplants.
- Combination: Use seeds for fast-growing plants and transplants for slower-growing or delicate varieties.
6. Stay Mindful of Maintenance Needs
Pick plants that match your availability for care and maintenance:
- Low-maintenance options: Herbs like rosemary and thyme are drought-tolerant, while succulents require minimal watering.
- Regular watering plants: Leafy greens and veggies like cucumbers need consistent watering to prevent wilting.
- Pest and disease resistance: Look for plant varieties labeled as resistant to common pests or diseases in your area.
7. Plan for Year-Round Gardening
With some planning, you can enjoy gardening throughout the year:
- Cool-season plants: Lettuce, kale, and pansies thrive in spring and fall.
- Warm-season plants: Tomatoes, zucchini, and marigolds flourish in summer.
- Perennials: Consider perennials like lavender or oregano that return year after year with minimal effort.
8. Research and Document Your Choices
Take the time to research the plants you want to grow:
- Read labels or seed packets: Look for details like sunlight requirements, watering needs, and growth habits.
- Create a gardening journal: Document your plant selections, planting dates, and observations. This helps you track what works well in your garden and plan for future seasons.
Next Steps
Now that you’ve selected the right plants, it’s time to gather your seeds or transplants and prepare your space for planting. By starting with easy-to-grow options and tailoring your choices to your environment, you’re setting yourself up for a rewarding gardening experience.
Remember, every gardener learns through experimentation. If a plant doesn’t thrive, it’s not a failure—it’s an opportunity to learn and try again. Happy planting!
Step 4: Creating a Gardening Plan
A well-thought-out gardening plan is essential for a thriving garden. Mapping out your garden helps you decide where to plant, how much space each plant requires, and the best time to plant them. By organizing your garden strategically, you’ll optimize growth, minimize maintenance, and avoid common gardening mistakes. In this step, we’ll guide you through creating a detailed gardening plan, tailored to your space and plants.
1. Sketch Your Garden Layout
Start with a simple drawing to visualize your gardening space and plant placement:
- Measure your space: Use a tape measure or pacing method to determine the dimensions of your gardening area. Note the locations of fixed elements like walls, fences, or large trees.
- Sketch to scale: Draw a rough layout on graph paper or use online tools to create a scaled plan. Mark areas for paths, planting beds, containers, or trellises.
- Designate zones: Divide your space into sections based on sunlight exposure (full sun, partial shade, or full shade). These zones will guide your plant placement.
2. Decide Where Each Plant Will Go
Position plants thoughtfully to maximize their growth potential:
- Group plants by sunlight needs:
- Full sun (e.g., tomatoes, peppers, marigolds): Place in the brightest areas.
- Partial shade (e.g., lettuce, spinach, ferns): Position in spots with dappled light or afternoon shade.
- Full shade (e.g., hostas, impatiens): Place in areas with minimal direct sunlight.
- Companion planting: Research which plants grow well together. For example:
- Basil repels pests when planted near tomatoes.
- Carrots benefit from being planted alongside onions, which deter carrot flies.
- Avoid competition: Keep plants with aggressive roots or sprawling habits, like mint or zucchini, away from smaller, delicate plants.
3. Plan for Proper Spacing
Overcrowding can lead to poor growth and increased susceptibility to disease. Account for each plant’s mature size:
- Follow spacing guidelines: Check seed packets or plant labels for recommended spacing. For example:
- Carrots need about 2 inches of spacing between plants.
- Tomato plants require 18–24 inches between each plant for proper airflow.
- Consider vertical gardening: Use trellises, stakes, or hanging pots for vining plants like cucumbers, beans, or strawberries. This saves ground space and improves access to sunlight.
- Create pathways: Leave space between rows or beds for easy access. A width of at least 2 feet allows for comfortable movement and maintenance.
4. Plan Your Planting Timeline
Timing is key to ensuring your plants grow in optimal conditions:
- Seasonal planting:
- Cool-season crops (e.g., lettuce, radishes, kale): Plant in early spring or fall when temperatures are mild.
- Warm-season crops (e.g., tomatoes, peppers, zucchini): Plant after the last frost date when the soil is warm.
- Stagger planting for continuous harvest: For vegetables like lettuce or radishes, sow seeds every 2–3 weeks for a steady supply.
- Use a calendar: Mark planting dates, transplanting schedules, and expected harvest times for each plant. This keeps you organized and on track.
- Plan crop rotation: If you’re gardening long-term, avoid planting the same crop in the same location each year to prevent soil depletion and pest buildup.
5. Incorporate Maintenance into Your Plan
Prepare for ongoing care to keep your garden healthy:
- Watering schedule: Group plants with similar water needs together to simplify irrigation. For example, succulents require less water, while leafy greens need frequent watering.
- Fertilizer plan: Identify when and how often to feed your plants. Use organic compost or balanced fertilizers based on each plant’s needs.
- Pest control: Plan for natural pest management by including pest-repelling plants (e.g., marigolds or lavender) in your garden.
- Mulching: Add a layer of mulch to reduce weeds and retain soil moisture. Incorporate this step into your layout to ensure space for mulching materials.
6. Plan for Growth and Harvest
Think ahead to how your garden will evolve:
- Consider mature sizes: Ensure plants won’t overcrowd each other as they grow. Leave room for spreading roots and foliage.
- Harvesting needs: Plan for easy access to harvest-ready plants. For example, plant vegetables like zucchini at the edge of beds for convenient picking.
- Succession planting: As plants finish their growing season, plan to replace them with new crops. For example, after harvesting spring lettuce, plant summer beans or herbs.
7. Document Your Plan
Keep a written or digital record of your gardening plan:
- Gardening journal: Include your sketch, planting schedule, and notes on plant care.
- Track progress: Record observations, challenges, and successes to improve future gardening efforts.
- Adjust as needed: Your plan doesn’t need to be rigid. Adapt it based on real-time conditions like weather changes or plant growth patterns.
Next Steps
Congratulations! By creating a detailed gardening plan, you’ve laid the foundation for a well-organized and productive garden. Your plan acts as a roadmap, guiding your efforts and ensuring every plant gets what it needs to thrive.
Next, you’ll move on to the fun part—bringing your plan to life by preparing the soil and planting your chosen plants. Stay patient, stay curious, and enjoy every step of this rewarding process!
We’re also giving these extra bonuses
Gardening Guide For Beginners – Checklist
Gardening Guide For Beginners – FAQs
Gardening Guide For Beginners – Salespage Content
Package Details:
Word Count: 19 222 Words
Number of Pages: 82
Gardening Guide For Beginners – Bonus Content
Checklist
Word Count: 651 words
FAQs
Word Count: 1027 words
Salespage Content
Word Count: 707 words
Total Word Count: 21 607 Words
Your PLR License Terms
PERMISSIONS: What Can You Do With These Materials?
Sell the content basically as it is (with some minor tweaks to make it “yours”).
If you are going to claim copyright to anything created with this content, then you must substantially change at 75% of the content to distinguish yourself from other licensees.
Break up the content into small portions to sell as individual reports for $10-$20 each.
Bundle the content with other existing content to create larger products for $47-$97 each.
Setup your own membership site with the content and generate monthly residual payments!
Take the content and convert it into a multiple-week “eclass” that you charge $297-$497 to access!
Use the content to create a “physical” product that you sell for premium prices!
Convert it to audios, videos, membership site content and more.
Excerpt and / or edit portions of the content to give away for free as blog posts, reports, etc. to use as lead magnets, incentives and more!
Create your own original product from it, set it up at a site and “flip” the site for megabucks!
RESTRICTIONS: What Can’t You Do With These Materials?
To protect the value of these products, you may not pass on the rights to your customers. This means that your customers may not have PLR rights or reprint / resell rights passed on to them.
You may not pass on any kind of licensing (PLR, reprint / resell, etc.) to ANY offer created from ANY PORTION OF this content that would allow additional people to sell or give away any portion of the content contained in this package.
You may not offer 100% commission to affiliates selling your version / copy of this product. The maximum affiliate commission you may pay out for offers created that include parts of this content is 75%.
You are not permitted to give the complete materials away in their current state for free – they must be sold. They must be excerpted and / or edited to be given away, unless otherwise noted. Example: You ARE permitted to excerpt portions of content for blog posts, lead magnets, etc.
You may not add this content to any part of an existing customer order that would not require them to make an additional purchase. (IE You cannot add it to a package, membership site, etc. that customers have ALREADY paid for.)
Share Now!
Latest Products


Free Sales Funnel Builder

Related Products
Popular & Trending


Featured Products