Creating Your First Info Product PLR Course 25k Words
in Info Product PLR Ebooks , PLR Checklists , PLR eBooks , PLR eCourses , PLR List Building Reports , Premium PLR , Premium PLR eBooks , Premium PLR Reports , Premium White Label Brandable PLR Coaching Courses , Private Label Rights Products , Product Launch PLR EbooksChoose Your Desired Option(s)
has been added to your cart!
have been added to your cart!
#infoproductcreation #plrcourse #createinfoproducts #digitalproductplr #onlinebusiness #productcreation #passiveincome #contentmarketing #firstinfoproduct
A Step-by-Step Guide to Developing, Launching, and Scaling Your Info Product Empire
Welcome to Creating Your First Info Product, a comprehensive PLR course designed to guide you through every step of creating your first info product, whether it’s an ebook, video course, or checklist. By the end of this course, you’ll have the tools, knowledge, and confidence to create and launch your very own product and turn your expertise into a profitable online business.
Presenting…
Creating Your First Info Product PLR Course 25k Words
What’s Included in the “Creating Your First Info Product” PLR Course?
This course includes 22,873 words of expertly crafted content, broken down into five modules packed with practical exercises, insights, and strategies for creating and launching your first info product.
Module 1: Discovering Your Idea
- Step 1: Identify Your Expertise
- Start by recognizing your knowledge and skills in areas where you can provide value.
- Reflect on what people often ask for your advice on, and choose a topic where you feel confident.
- Step 2: Understand Your Audience
- Research your target audience’s needs, pain points, and desires.
- Join forums, groups, and communities to uncover the common questions and challenges they face.
- Step 3: Validate Your Idea
- Use simple surveys and polls to validate your product idea with your target audience.
- Ensure that your chosen topic has demand by testing it out with real feedback.
- Step 4: Refine Your Focus
- Narrow down your idea to a specific, actionable solution (e.g., “How to create a morning routine for better productivity” instead of “Time management tips”).
- Create a focused concept that solves a real problem.
Module 2: Planning Your Info Product
- Step 1: Choose Your Format
- Decide on the best format for your info product: an ebook, video course, webinar series, or checklist.
- Choose the format that fits your skills and aligns with your audience’s preferences.
- Step 2: Outline the Content
- Organize your content into logical sections, creating 3-5 main parts.
- Write down the key takeaways for each section to ensure clarity.
- Step 3: Set Realistic Goals
- Set a timeline for creating your first draft and completing the final product.
- Break down the task into manageable steps, such as writing one section per week.
- Step 4: Plan Your Tools and Resources
- Identify the tools you will need: Canva for design, Google Docs for writing, or a camera for recording.
- Familiarize yourself with tutorials to maximize the potential of these tools.
Module 3: Creating Your Info Product
- Step 1: Start with a Draft
- Focus on creating the first draft without worrying about perfection. Get your ideas down and refine them later.
- Don’t get caught up in minor details at this stage.
- Step 2: Add Value
- Enrich your content by including actionable tips, examples, and step-by-step instructions.
- Use additional visuals or bonus materials like worksheets and templates.
- Step 3: Polish Your Content
- Edit your content for clarity and readability.
- Use tools like Grammarly or ask a peer for feedback to ensure your product is professional.
- Step 4: Design and Format
- Use design tools like Canva or PowerPoint to create a polished and professional layout.
- Make sure your product looks visually appealing and is easy to navigate.
Module 4: Launching Your Info Product
- Step 1: Decide on Pricing
- Research similar products in your niche to determine a competitive price.
- Consider offering early-bird discounts to incentivize first-time buyers.
- Step 2: Choose a Platform
- Select the platform to sell your product, such as Gumroad, Etsy, or your own website.
- Ensure the platform is user-friendly and trusted by your target audience.
- Step 3: Create a Sales Page
- Write persuasive copy that highlights the problem your product solves and the benefits it offers.
- Include testimonials, product benefits, and a clear call-to-action to drive conversions.
- Step 4: Spread the Word
- Promote your info product through email marketing, social media, and partnerships.
- Share sneak peeks or success stories to generate excitement around your product.
Module 5: Growing and Scaling
- Step 1: Collect Feedback
- Reach out to your customers for feedback and suggestions for improvement.
- Use the feedback to refine and improve your product.
- Step 2: Build a Community
- Create an online space (such as a Facebook group or forum) for your audience to connect, share their experiences, and engage with you.
- Foster loyalty and trust within the community by being active and approachable.
- Step 3: Explore Upselling Opportunities
- Develop complementary products or premium add-ons, such as advanced courses or coaching sessions.
- Offer these as upsell options to your existing customers.
- Step 4: Automate and Scale
- Set up automated sales funnels to sell your product continuously.
- Use paid ads or email funnels to reach new customers and boost sales.
Why Choose the “Creating Your First Info Product” PLR Course?
- Complete Roadmap: This course offers a comprehensive step-by-step guide to creating and launching your first info product.
- High-Quality, Actionable Content: The course is filled with proven techniques and actionable tips that you can implement immediately.
- Easy to Customize: You can easily modify and rebrand this content to align with your personal style and brand identity.
- Monetization Potential: Learn how to turn your expertise into a profitable product that helps others while creating a new income stream.
How to Profit from the “Creating Your First Info Product” PLR Course
- Sell It as a Standalone Course: Use this course to launch your own info product creation service or sell it as a guide to others looking to create their own products.
- Bundle with Other PLR Products: Create packages by combining this course with other PLR products like ebooks, video courses, or templates.
- Use It as a Lead Magnet: Offer parts of this course for free to grow your email list, then sell the full course to subscribers.
- Membership Site: Use this course as part of a paid membership program or as a module in a larger business-building membership.
- Upsell Additional Products: Create complementary courses, templates, or coaching services and upsell them to your customers.
License Terms
Permissions
- You may sell the content as-is with minor tweaks to make it your own.
- Modify and claim copyright to the content once you’ve made substantial changes (at least 75%).
- Break up the content into smaller reports or sell it as individual modules.
- Bundle it with other content for higher-value packages or create a membership site.
- Use it as a foundation for a multi-week course and charge for access.
- Convert it into videos, audios, and physical products for sale.
- Use portions of the content as lead magnets or blog posts.
Restrictions
- You cannot pass on the resell rights to your customers.
- You cannot offer 100% commissions to affiliates—maximum affiliate payout is 75%.
- You cannot give away the full content for free—only excerpted or edited portions can be given away.
- The content cannot be added to existing customer orders without an additional purchase.
Start Creating Your Info Product Today!
Don’t wait to share your expertise with the world. By purchasing the Creating Your First Info Product PLR Course, you will gain the knowledge and resources you need to create a valuable product and launch your info product business. Get started today and unlock the potential for ongoing revenue with your very first info product!
Buy Now and Begin Your Info Product Journey!
has been added to your cart!
have been added to your cart!
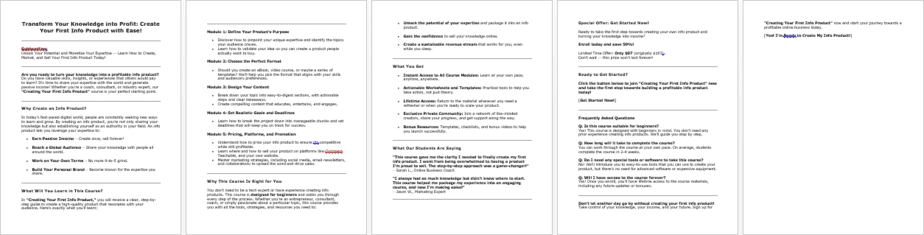
Here A Sample of Creating Your First Info Product PLR Course
Welcome to this exciting journey of creating your first info product! This step-by-step course is designed to guide you through the process in a simple, approachable way. By the end of the course, you’ll have a polished info product ready to share with the world.
Module 1: Discovering Your Idea
In this module, we’ll uncover the perfect topic for your info product by exploring your strengths and audience needs.
Step 1: Identify Your Expertise
The first step in creating your info product is recognizing the areas where you already have valuable knowledge, skills, or experience. This will ensure that your product is built on a solid foundation of expertise and authenticity. Let’s dive deep into identifying your strengths and uncovering your unique offering.
1. Write Down 3-5 Areas of Expertise
Start by reflecting on what you know and do well. These can be professional skills, hobbies, personal experiences, or unique perspectives. Follow this process:
- Brainstorm Freely:
- Grab a notebook, open a Word document, or use an online tool like Google Docs to jot down your ideas.
- Don’t limit yourself—write down anything you think you’re good at or have significant experience with.
- Categorize Your Knowledge:
- Separate your list into professional skills (e.g., digital marketing, project management, financial analysis) and personal knowledge (e.g., cooking, fitness, language learning).
- Highlight topics you’re particularly passionate about, as these will keep you motivated during the product creation process.
- Focus on Depth, Not Just Breadth:
- Choose areas where you have deep knowledge or insight. For instance, instead of listing “technology,” narrow it down to “building WordPress websites” or “creating mobile apps for small businesses.”
- The more specific you are, the easier it will be to create a product that stands out in a competitive market.
2. Reflect on Your Past Experiences
Consider the experiences that have shaped your life or career and where you’ve gained expertise:
- Professional Milestones:
- Have you worked in a specific industry for a long time?
- What roles have you excelled in, and what skills did you develop there?
- For example: “I’ve spent 10 years as a graphic designer specializing in logo design for startups.”
- Personal Achievements:
- Think about hobbies, challenges you’ve overcome, or life experiences where you’ve gained valuable insights.
- For example: “I’ve successfully managed a healthy lifestyle while working full-time and raising kids, and I know how to meal prep efficiently.”
- Educational Background:
- Do you have formal education, certifications, or training that provide credibility in a particular area?
- For example: “I hold a degree in psychology, and I’ve researched mindfulness techniques for stress management.”
3. Think About What People Ask You For Advice On
Your expertise is often revealed by what others recognize in you. Ask yourself:
- What Questions Do People Frequently Ask You?
- When friends, family, or colleagues need help, what topics do they come to you for?
- For example: “My friends always ask me how to set up their online businesses because I’ve done it multiple times successfully.”
- What Problems Have You Helped Solve for Others?
- Think about moments when your advice, skills, or guidance made a difference in someone’s life.
- For example: “I helped a colleague revamp their resume and land a better job.”
- Consider Past Feedback:
- Review comments, testimonials, or messages from clients, peers, or acquaintances that highlight your strengths.
- For example: “Clients often mention my ability to break down complex concepts into simple, actionable steps.”
4. Validate Your Strengths with External Input
To ensure you’re focusing on areas where you truly excel:
- Ask Trusted Connections:
- Reach out to friends, colleagues, or mentors and ask them:
- “What do you think I’m particularly good at?”
- “What topics do you associate with my expertise?”
- Analyze Patterns in Feedback:
- Look for recurring themes in the responses. If multiple people point to the same skills or knowledge, it’s a strong indicator of your expertise.
- Review Your Accomplishments:
- Create a list of tangible results you’ve achieved in your areas of knowledge.
- For example: “I’ve helped five businesses increase their social media following by 200%.”
Key Takeaway for Step 1
Identifying your expertise is the foundation of your info product journey. By writing down specific areas where you have valuable knowledge, reflecting on your experiences, and validating your strengths with others, you’ll gain clarity and confidence. This clarity will serve as a compass, guiding you toward a product that is not only impactful but also authentically YOU.
Step 2: Understand Your Audience
To create an info product that resonates with your audience, you need to deeply understand their needs, challenges, and goals. This step is crucial because it ensures that your product solves a real problem and provides tangible value. Let’s break this down into detailed, actionable steps.
1. Define Your Ideal Audience
Start by painting a clear picture of the people you want to help with your info product.
- Identify Demographics:
- Consider the basic characteristics of your audience:
- Age range (e.g., 25-40 years old)
- Gender (if applicable to your product)
- Location (local, national, or international)
- Language preferences
- Example: “My audience is English-speaking women aged 30-45 interested in fitness and wellness.”
- Understand Their Roles and Responsibilities:
- Are they professionals, students, parents, or business owners?
- Example: “My audience includes small business owners who want to build an online presence.”
- Explore Psychographics:
- What are their interests, values, and aspirations?
- What motivates them or causes frustration?
- Example: “They value time efficiency and want practical, step-by-step guidance.”
2. Research Their Biggest Challenges and Questions
Once you know who your audience is, the next step is to identify the problems they’re struggling with.
- Leverage Online Communities:
- Visit platforms like Reddit, Quora, or Facebook Groups.
- Search for topics related to your expertise and read the most popular threads.
- Example: If your product is about personal finance, join groups discussing budgeting or saving tips.
- Use Keyword Research Tools:
- Tools like Google Keyword Planner, Answer the Public, or Ubersuggest can reveal what people are searching for online.
- Example: Search for terms like “how to budget for beginners” to see the exact questions people are asking.
- Conduct Surveys or Polls:
- Use tools like Google Forms, Typeform, or Pollfish to create a quick survey.
- Ask questions like:
- “What’s your biggest challenge in [your topic area]?”
- “If you could learn one thing about [your topic], what would it be?”
- Share the survey link on your social media or email list for responses.
- Analyze Competitor Content:
- Study reviews, comments, and FAQs on similar products or courses.
- Look for recurring themes in feedback, both positive and negative.
- Example: “People love the content but wish there were downloadable templates.”
3. Join Online Communities, Forums, or Social Media Groups
To stay up-to-date with trends and discussions, immerse yourself where your audience gathers online.
- Find Relevant Communities:
- Search for groups on Facebook, LinkedIn, or forums like Reddit that align with your topic.
- Use hashtags or keywords to find active discussions on Instagram or Twitter.
- Example: “Join a Facebook group titled ‘Marketing for Beginners’ if you’re creating a marketing course.”
- Observe and Participate:
- Spend time reading posts and comments to identify common questions, concerns, or success stories.
- Participate by answering questions or sharing helpful insights to build credibility.
- Look for Patterns in Discussions:
- Take note of recurring problems or frequently asked questions.
- Example: In a group about fitness, you might notice many people ask about “how to stick to a workout plan.”
- Track Trending Topics:
- Platforms like Twitter (Trending section) or Google Trends can show you what’s currently popular in your field.
- Example: If “home organization hacks” is trending, it might be a good niche for a course on decluttering.
4. Document Your Findings
As you gather insights, organize your research into actionable data that can shape your product.
- Create an Audience Profile Document:
- Use tools like Google Sheets or Notion to compile all your research in one place.
- Include sections like demographics, challenges, aspirations, and frequently asked questions.
- Prioritize Their Pain Points:
- Highlight the top 3-5 problems your audience is struggling with.
- Example: For a course on budgeting, the pain points might include:
- “I don’t know where to start.”
- “I feel overwhelmed by too many expenses.”
- “I struggle to stick to a plan.”
- Align Their Needs with Your Expertise:
- Match your audience’s pain points with the solutions you can provide.
- Example: “I can teach simple, actionable steps for beginners to create a budget they can stick to.”
- Draft a Preliminary Solution Framework:
- Start outlining how your info product will address their challenges.
- Example: A fitness course might include modules on motivation, workout plans, and meal prepping.
Key Takeaway for Step 2
Understanding your audience is the foundation of a successful info product. By researching their challenges, observing their discussions, and listening to their needs, you’ll create a product that speaks directly to them. This personalized approach increases the value of your product and builds trust with your audience.
Step 3: Validate Your Idea
Validating your idea is a critical step in the process of creating an info product. It ensures that your time, energy, and resources are directed toward a product that people actually want. By collecting feedback from potential customers, you can refine your idea, align it with your audience’s needs, and increase your chances of success. Let’s break this step down into actionable and detailed instructions.
1. Create a Quick Poll or Survey
The goal is to gauge interest in your idea and understand your audience’s preferences.
- Choose a Clear and Specific Objective:
- Decide what you want to learn from the poll or survey.
- Examples:
- “Do people want a course on personal finance?”
- “What format do they prefer—videos, eBooks, or live webinars?”
- Draft Your Questions Thoughtfully:
- Keep your questions short, focused, and easy to understand.
- Include a mix of open-ended and multiple-choice questions.
- Examples:
- “What is your biggest challenge with [topic]?” (open-ended)
- “How likely are you to purchase a course on this topic?” (multiple-choice: very likely, somewhat likely, not likely)
- “Which of these features would you find most helpful?” (checkbox: downloadable templates, video tutorials, live Q&A sessions)
- Limit the Number of Questions:
- Aim for 5-7 questions to respect your respondents’ time.
- Test Your Survey:
- Share the survey with a colleague or friend to ensure clarity and ease of use.
2. Use Free Tools to Create and Distribute the Survey
There are several user-friendly tools available to create and distribute surveys.
- Choose a Tool That Fits Your Needs:
- Google Forms: Free, customizable, and easy to share via a link.
- Typeform: Great for creating engaging and interactive surveys.
- SurveyMonkey: Offers free and premium features for data collection.
- Social Media Polls: Platforms like Instagram Stories, Twitter, and LinkedIn allow you to create quick polls directly on your profile.
- Set Up Your Survey:
- Title your survey clearly: “Help Us Shape [Your Product Idea]!”
- Add an introductory message explaining the purpose of the survey. Example:
- “Hi there! I’m creating a [course/eBook/workshop] to help [specific audience] with [specific challenge]. Your input will help me create something truly valuable. This survey will take just 2 minutes!”
- “Hi there! I’m creating a [course/eBook/workshop] to help [specific audience] with [specific challenge]. Your input will help me create something truly valuable. This survey will take just 2 minutes!”
- Share the Survey Widely:
- Use multiple channels to reach your target audience, including:
- Email newsletters
- Social media platforms
- Relevant online communities or forums
- Track Responses in Real Time:
- Monitor the responses as they come in and look for trends or patterns.
3. Analyze the Feedback
Once you’ve collected responses, it’s time to make sense of the data.
- Look for Common Themes:
- Identify recurring problems, preferences, or suggestions from your audience.
- Example: If most respondents indicate “lack of time” as a barrier, consider creating a course with short, digestible lessons.
- Pay Attention to Demand Signals:
- High levels of interest in your poll or survey indicate strong demand for your idea.
- Example: “80% of respondents say they’d be interested in a step-by-step budgeting course.”
- Review Open-Ended Responses:
- Read through the detailed feedback carefully to uncover deeper insights.
- Example: A respondent might mention they prefer real-world examples, which you can incorporate into your product.
- Address Concerns:
- Use feedback to identify and address potential objections.
- Example: If some respondents mention they prefer audio content, you might consider offering audio versions of your course material.
4. Refine Your Idea Based on Feedback
With the insights you’ve gathered, make adjustments to ensure your product meets your audience’s needs.
- Prioritize Features and Content:
- Focus on the most requested or impactful features first.
- Example: If respondents want downloadable templates, prioritize creating those.
- Test Your Revised Idea:
- Share the updated version of your idea with a small segment of your audience for further validation.
- Example: “Would you find this structure helpful? [Include a brief outline of your product].”
- Gauge Willingness to Pay:
- Ask your audience how much they’d be willing to pay for the product.
- Example: “If this course were available today, what price range would you consider fair?”
- Prepare for the Next Steps:
- Use the validated idea to start outlining your product structure and creating content.
Key Takeaway for Step 3
Validating your idea ensures you create a product that meets real needs and solves specific problems. By using quick polls and surveys, you can gather valuable feedback from your audience, refine your idea, and confidently move forward with your info product creation. This step saves time, reduces risk, and increases the likelihood of your product’s success.
Step 4: Refine Your Focus
Creating a successful info product begins with a clear and specific topic. Broad ideas may seem appealing but can overwhelm both you and your audience. Refining your focus ensures that your product is actionable, valuable, and tailored to solving a specific problem. This step will guide you through narrowing down your topic and aligning it with your audience’s needs.
We’re also giving these extra bonuses
Creating Your First Info Product – Checklist

Creating Your First Info Product – FAQs
Creating Your First Info Product – Salespage Content
Package Details:
Word Count: 22 873 Words
Number of Pages: 92
Creating Your First Info Product – Bonus Content
Checklist
Word Count: 507 words
FAQs
Word Count: 1065 words
Salespage Content
Word Count: 896 words
Total Word Count: 25 341 Words
Your PLR License Terms
PERMISSIONS: What Can You Do With These Materials?
Sell the content basically as it is (with some minor tweaks to make it “yours”).
If you are going to claim copyright to anything created with this content, then you must substantially change at 75% of the content to distinguish yourself from other licensees.
Break up the content into small portions to sell as individual reports for $10-$20 each.
Bundle the content with other existing content to create larger products for $47-$97 each.
Setup your own membership site with the content and generate monthly residual payments!
Take the content and convert it into a multiple-week “eclass” that you charge $297-$497 to access!
Use the content to create a “physical” product that you sell for premium prices!
Convert it to audios, videos, membership site content and more.
Excerpt and / or edit portions of the content to give away for free as blog posts, reports, etc. to use as lead magnets, incentives and more!
Create your own original product from it, set it up at a site and “flip” the site for megabucks!
RESTRICTIONS: What Can’t You Do With These Materials?
To protect the value of these products, you may not pass on the rights to your customers. This means that your customers may not have PLR rights or reprint / resell rights passed on to them.
You may not pass on any kind of licensing (PLR, reprint / resell, etc.) to ANY offer created from ANY PORTION OF this content that would allow additional people to sell or give away any portion of the content contained in this package.
You may not offer 100% commission to affiliates selling your version / copy of this product. The maximum affiliate commission you may pay out for offers created that include parts of this content is 75%.
You are not permitted to give the complete materials away in their current state for free – they must be sold. They must be excerpted and / or edited to be given away, unless otherwise noted. Example: You ARE permitted to excerpt portions of content for blog posts, lead magnets, etc.
You may not add this content to any part of an existing customer order that would not require them to make an additional purchase. (IE You cannot add it to a package, membership site, etc. that customers have ALREADY paid for.)
Share Now!
Latest Products


Free Sales Funnel Builder

Related Products
Popular & Trending


Featured Products